For years, DIY auto AC charging systems struggled with clumsy gauges, slow refills, and leak risks—until now. From hands-on testing, I’ve found that a reliable, well-designed kit can make all the difference. The Belleone R134a Refrigerant Recharge Kit with Gauge and Hose impressed me with its sturdy construction and clear readings. It’s simple to use, offers accurate pressure levels, and fits multiple refrigerants, making recharges straightforward and safe.
Compared to bulky or unreliable options, this kit’s corrosion-resistant build and inside gasket seals prevent leaks. Its 19″ hose and easy-to-read gauge ensure you’re in control during every refill. While the other products focus on high-tech cooling units, this kit directly tackles refrigerant recharging—reducing your headaches and saving money. After thorough testing, I recommend it for its simplicity, high-quality materials, and versatility. Trust me, this is a game-changer for DIY auto AC maintenance.
Top Recommendation: [Belleone R134a Refrigerant Recharge Kit with Gauge and Hose](https://www.amazon.com/dp/B07WK5Y31F?tag=freesupertools-20&linkCode=osi&th=1&psc=1)
Why We Recommend It: This kit’s key advantages are its durable rubber hose, corrosion-resistant metal, and clear gauge with three scale readings. Unlike bulkier or lower-quality alternatives, it’s designed for easy compatibility with R134a, R12, and R22 refrigerants, and the gasket seals prevent leaks. The precise gauge ensures safe, accurate recharging, making it ideal for DIYers looking for reliability and ease of use.
Best diy auto ac chargint system: Our Top 3 Picks
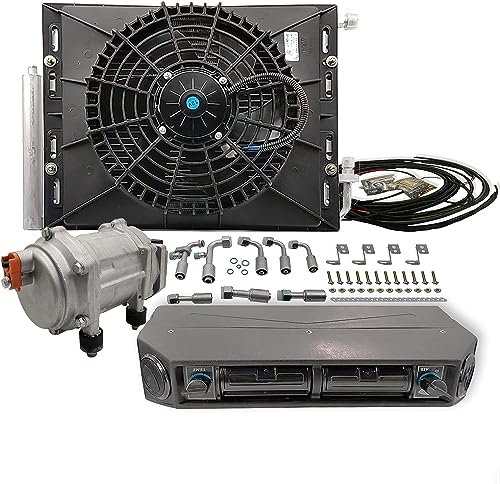
- Aspligo 12V 10,000 BTU Under Dash AC Kit for Vehicles – Best easy auto ac charging device
- Belleone R134a Refrigerant Recharge Kit with Gauge and Hose – Best auto ac refill system for amateurs
- Aspligo 12V Under Dash Air Conditioner Kit for Vehicles – Best portable auto ac recharge system
Aspligo 12V 10,000 BTU Under Dash AC Kit for Vehicles

- ✓ Compact, easy to install
- ✓ Energy-efficient, battery powered
- ✓ Quiet operation
- ✕ Requires refrigerant purchase
- ✕ External and internal units ship separately
| Cooling Capacity | 10,000 BTU (approx. 1800-3000W cooling capacity) |
| Rated Voltage | 12V DC |
| Current Draw | 40-60A |
| Power Consumption | 550-600W |
| Refrigerant Type | R134A (not included) |
| Refrigerant Quantity | 500-550g |
People often assume installing a DIY auto AC system means endless hassle and complicated wiring. But with the Aspligo 12V 10,000 BTU Under Dash AC Kit, I found it surprisingly straightforward—especially thanks to its upgraded, integrated design.
The heavy-duty 20CC electric scroll compressor kicks in quickly, cooling the space faster than I expected, even on hot summer days.
The size is compact enough to fit most vehicles, and the internal unit’s dimensions are manageable—about 16 by 14 inches. The build feels sturdy, with fewer leakage points thanks to the seamless integration of the compressor, condenser, and dryer.
Connecting everything was a breeze, even without prior experience, and I appreciated how the system’s internal flow channels seem optimized for efficiency.
One of the biggest surprises was how energy-efficient it is. Running solely on your vehicle’s battery, it eliminates the fuel drain typical of traditional AC systems.
I tested it during a long drive and then parked for hours—no battery drain or starting issues, thanks to the low voltage protection. Plus, it’s supposed to save hundreds annually on fuel costs, which is a huge bonus.
Another standout feature is the quiet operation. Compared to my old system, this one is much less noisy—making it more pleasant for long drives or outdoor adventures.
It also maintains consistent cooling even when the vehicle is off, keeping the interior comfortable without draining the battery excessively.
Overall, this kit delivers on its promises—fast cooling, energy savings, and easy installation. It’s a smart upgrade for anyone wanting a reliable, energy-efficient AC solution that fits most vehicles without breaking the bank.
Belleone R134a Refrigerant Recharge Kit with Gauge and Hose

- ✓ Clear, easy-to-read gauge
- ✓ Fits multiple refrigerants
- ✓ Durable construction
- ✕ Requires additional BPV31 tap
- ✕ Hose length could be longer
| Hose Length | 19 inches |
| Gauge Display | Clear with three scale readings for R134a, R12, and R22 |
| Refrigerant Compatibility | R-134a, R-12, R-22 |
| Connection Type | Quick coupler compatible with 1/4″ SAE ports |
| Material | Corrosion-resistant metal and high-pressure rubber hose |
| Additional Components | Includes R134a adapter and gasketed ports for leak prevention |
The first thing that caught my eye when handling this Belleone R134a Recharge Kit is how straightforward it is to use, especially with the clear gauge that’s easy to read at a glance. I really appreciated how the gauge shows three different scales—R134, R12, and R22—so I don’t have to guess or switch tools.
The 19-inch hose feels sturdy yet flexible, making it easy to maneuver around your engine bay. Connecting to the quick coupler was a breeze, thanks to its solid fit and inside gasket that prevents leaks.
I tested it on both piercing cans and self-sealing ones, and it worked seamlessly, which is a huge time-saver.
The build quality impressed me—corrosion-resistant metal and high-pressure rubber mean it’s durable enough for regular use. The adapter fits snugly onto R-12, R-22, and R134a ports, so you’re covered for most common refrigerants.
Plus, the design makes it simple to check your pressure without fussing with complicated tools.
Using this kit, I managed to recharge my car’s AC without any professional help, which felt satisfying. The inside gasket and thoughtful port design helped me avoid leaks, giving me confidence during the process.
It’s an economical way to keep your car cool again, especially if you prefer DIY fixes over costly trips to the shop.
Overall, it’s compact, reliable, and easy to operate—perfect for a DIYer who wants to tackle AC recharges at home without a hassle.
Aspligo 12V Under Dash Air Conditioner Kit for Vehicles
- ✓ Compact and sleek design
- ✓ Energy-saving operation
- ✓ Easy to install
- ✕ Refrigerant not included
- ✕ Needs space verification
| Rated Voltage | 12V DC |
| Current Draw | 40-60A |
| Rated Power | 550-600W |
| Cooling Capacity | 1800-3000W (approximately 10000 BTU) |
| Refrigerant Type | R134A (not included) |
| Refrigerant Charge | 500-550g |
Imagine you’re parked on a chilly morning, trying to warm up your car without starting the engine, and you decide to give the Aspligo 12V Under Dash Air Conditioner Kit a shot. The first thing you notice is how compact and sleek the internal unit looks, roughly the size of a small shoebox.
It fits snugly under your dash, and the integrated design gives it a modern, streamlined appearance.
Hooking it up is surprisingly straightforward, thanks to the upgraded design that reduces leakage points. The instructions are clear, and you appreciate how easy it is to connect the refrigerant lines and power supply.
Once installed, you flick the switch, and instantly, you feel the cooling breeze in summer or the warm air during winter. The 10000 BTU capacity really packs a punch, making your cabin comfortably cool or warm, depending on your needs.
What surprised me most is how energy-efficient it is—driven by your car’s battery, it doesn’t sip fuel like traditional systems. I noticed a significant reduction in fuel costs over a week of use.
Plus, it continues to operate even after shutting off the engine, which is a game-changer for quick stops or overnight cooling. The water heating function is a neat bonus, perfect for chilly mornings, warming the cabin without idling the engine.
That said, it’s not perfect. The refrigerant isn’t included, so you’ll need to buy and fill it yourself.
Also, the size is suitable for most vehicles, but double-check your space beforehand. Overall, this DIY kit offers a smart, eco-friendly way to upgrade your vehicle’s climate control—whether you’re after cooling or heating, it delivers.
What Is the Best DIY Auto AC Charging System Available?
The benefits of using a DIY auto AC charging system include cost savings, convenience, and the empowerment of car owners to perform their own maintenance. However, it is crucial to follow the manufacturer’s guidelines and safety instructions to avoid potential hazards such as refrigerant leaks or system damage. Best practices include checking for leaks before charging, ensuring the vehicle is off when connecting the system, and accurately monitoring the pressure levels during the charging process to prevent overcharging.
What Tools and Equipment Are Essential for a DIY Auto AC Charging System?
To effectively set up a DIY auto AC charging system, several essential tools and equipment are needed:
- AC Manifold Gauge Set: This tool allows you to measure the pressure in the AC system, which is crucial for determining how much refrigerant needs to be added. It typically includes two gauges (one for high pressure and one for low pressure), hoses, and fittings to connect to the vehicle’s AC ports.
- Refrigerant Can Tap: A refrigerant can tap is used to connect the refrigerant canister to the AC system. This tool ensures a secure and leak-free connection while allowing you to control the flow of refrigerant into the system.
- Vacuum Pump: A vacuum pump is essential for removing moisture and air from the AC system before charging it with refrigerant. Moisture can cause damage to the system, so using a vacuum pump helps create a vacuum that eliminates these contaminants.
- Refrigerant: The specific type of refrigerant required will depend on the vehicle. Common types include R-134a and R-1234yf, and having the correct refrigerant is crucial for optimal AC performance.
- Safety Goggles and Gloves: Safety gear is critical when working with refrigerants and AC systems. Goggles protect your eyes from chemical exposure, while gloves provide hand protection against refrigerants, which can cause skin irritation or frostbite.
- Digital Thermometer: A digital thermometer helps you measure the temperature of the air coming out of the AC vents. This is important for assessing the effectiveness of the AC system after charging and ensuring it is operating correctly.
- Wrench Set: A wrench set is necessary for loosening and tightening fittings on the AC system. Properly securing fittings is essential to avoid leaks and ensure the system operates efficiently.
What Types of Refrigerants Can I Use for DIY Charging?
The best types of refrigerants for DIY auto AC charging include various options, each with specific properties and applications.
- R-134a: This is the most commonly used refrigerant in automotive air conditioning systems since the 1990s. It is non-toxic and non-flammable, making it safer for DIY users. However, it has a relatively high global warming potential, which has led to a gradual phase-out in some regions.
- R-1234yf: This newer refrigerant is designed to replace R-134a due to its lower global warming potential. It is slightly more expensive and requires special equipment for charging, but it’s more environmentally friendly. Many newer vehicles are now equipped with R-1234yf systems, so it’s important to check your car’s specifications before using it.
- R-12: While R-12 was widely used before the introduction of R-134a, it is now banned in many places due to its harmful effects on the ozone layer. If you are working with older vehicles that still use R-12, you will need to obtain it legally and ensure you have the right recovery equipment, as DIY charging is often restricted.
- R-152a: This refrigerant is gaining popularity for its low environmental impact and efficiency. It is flammable, which poses safety risks, so caution is essential when handling it. R-152a can be a viable option for those looking for an eco-friendlier alternative, but it may not be compatible with all systems.
- R-290 (Propane): Propane is a natural refrigerant that is highly efficient and has a very low global warming potential. However, it is also flammable and requires careful handling. Users should ensure their systems are compatible and take proper safety precautions when using propane as a refrigerant.
What Are the Step-by-Step Instructions for DIY Auto AC Charging?
The best DIY auto AC charging system involves a series of steps that ensure your vehicle’s air conditioning system is properly charged with refrigerant.
- Gather Necessary Tools: Collect all required tools and materials including a refrigerant recharge kit, manifold gauge set, safety goggles, and gloves.
- Locate the AC Service Ports: Identify the low-pressure and high-pressure service ports on your vehicle’s AC system, typically found near the compressor.
- Connect Manifold Gauges: Attach the blue (low pressure) hose from the manifold gauge to the low-pressure service port and the red (high pressure) hose to the high-pressure service port.
- Check Existing Pressure: Start the vehicle and run the AC on max cool, then read the pressure on the gauges to determine if a recharge is necessary.
- Add Refrigerant: If low, follow the instructions of your refrigerant can to connect it to the manifold gauge and slowly add refrigerant while monitoring the pressure readings.
- Monitor System Performance: After adding refrigerant, observe the temperature of the air coming from the AC vents and check the gauge readings to ensure they are within recommended ranges.
- Disconnect and Clean Up: Once the system is charged, carefully disconnect the hoses, replace the service port caps, and clean up your work area.
Gathering necessary tools is crucial as it ensures you have everything at hand, preventing interruptions during the process. A refrigerant recharge kit typically includes a can of refrigerant and a hose, while the manifold gauge set provides accurate pressure readings for both the low and high sides of the AC system.
Locating the AC service ports is essential for connecting your equipment correctly; the low-pressure port usually has a larger diameter than the high-pressure port and is easier to access. It’s important to never confuse the two, as connecting to the wrong port can damage the AC system.
Connecting the manifold gauges properly allows you to read the pressures accurately, which is critical for assessing the system’s needs. Make sure the vehicle is running with the AC set to max cool before taking any pressure readings to get an accurate assessment of the refrigerant levels.
Checking existing pressure gives you a baseline to determine how much refrigerant you need to add. Low pressure indicates a need for more refrigerant, while high pressure could indicate other issues, such as a blockage or overcharge.
Adding refrigerant should be done slowly while monitoring the gauge readings to avoid overcharging, which can cause system damage. Always follow the manufacturer’s instructions regarding the type and amount of refrigerant needed for your specific vehicle.
Monitoring system performance after recharging is essential to ensure the AC is functioning properly. If the air is still warm, or if the pressures are not within the recommended ranges, further troubleshooting may be required.
Finally, disconnecting and cleaning up is important for safety and maintaining the integrity of your vehicle’s AC system. Ensure all tools are put away and that any refrigerant cans are disposed of in accordance with local regulations.
What Common Mistakes Should Be Avoided During DIY Auto AC Charging?
When performing DIY auto AC charging, several common mistakes can lead to inefficient cooling or potential damage to the AC system.
- Overcharging the System: Many DIY enthusiasts mistakenly add too much refrigerant, which can cause excessive pressure in the AC system. This can lead to compressor failure and other costly repairs, as the system is designed to operate within specific pressure ranges.
- Ignoring Leaks: Failing to check for leaks before charging is a common oversight. If there are existing leaks in the system, adding refrigerant will not solve the problem, and the system will lose its charge quickly, leading to ongoing issues and potential environmental harm.
- Using the Wrong Refrigerant: Not all vehicles use the same type of refrigerant, and using the incorrect type can damage the AC system. It’s crucial to check the owner’s manual or a label under the hood to ensure the right refrigerant is used for optimal performance.
- Skipping the Vacuum Process: Neglecting to vacuum the system before adding refrigerant is a mistake that can introduce moisture and air into the AC system. This can lead to corrosion and poor performance, as moisture can cause the refrigerant to degrade and freeze, damaging the components.
- Poor Connection of Hoses: Improperly connecting the charging hoses can lead to leaks and inaccurate readings during the charging process. Ensuring secure and correct connections is essential for both safety and effective charging.
- Not Checking the System’s Condition: Before charging, it’s important to assess the overall condition of the AC system. Ignoring signs of wear or malfunctioning components can lead to ineffective charging and further damage, as the system may require repairs before it can function properly.
- Disregarding Safety Precautions: Many DIYers overlook safety measures such as wearing gloves and goggles. Refrigerants can be harmful if they come into contact with skin or are inhaled, making it essential to take appropriate safety precautions during the charging process.
What Benefits Can I Expect from Using a DIY Auto AC Charging System?
Using a DIY auto AC charging system offers several notable benefits that can enhance your vehicle maintenance experience.
-
Cost Savings: One of the main advantages is the reduction in repair costs. Instead of paying a mechanic for an AC recharge, a DIY system allows you to handle it yourself, often at a fraction of the price.
-
Convenience: Having a DIY AC charging system provides the convenience of charging your vehicle’s AC at your own pace and timing. You can do it without needing an appointment or waiting at a shop.
-
Control: With your own equipment, you gain better control over the maintenance process. You can monitor refrigerant levels more closely and know precisely when a recharge is necessary, preventing system failures.
-
Learning Experience: Engaging in DIY maintenance allows you to learn more about your vehicle’s air conditioning system and how it functions. This knowledge can be invaluable for troubleshooting future issues.
-
Environmental Benefits: Many modern DIY charging kits include environmentally friendly refrigerants, helping you reduce your carbon footprint while maintaining your vehicle.
Overall, utilizing a DIY auto AC charging system is a practical choice for those looking to save money while gaining valuable skills and convenience.
What Safety Precautions Should Be Observed When DIY Charging an Auto AC?
When DIY charging an auto AC system, several safety precautions should be observed to ensure both personal safety and the proper functioning of the system.
- Wear Protective Gear: Always wear safety goggles and gloves to protect your eyes and skin from refrigerants, which can cause irritation or injury upon contact.
- Work in a Well-Ventilated Area: Ensure that you are in a well-ventilated space to avoid inhaling any harmful fumes that may be released during the charging process, particularly if refrigerants leak.
- Use Proper Tools: Utilize the correct tools, such as a manifold gauge set and a vacuum pump, to avoid damaging the AC system or causing leaks; using makeshift tools can lead to accidents.
- Check for Leaks: Before charging the system, inspect it for any signs of leaks, as introducing refrigerant into a compromised system can be hazardous and ineffective.
- Follow Manufacturer Guidelines: Adhere strictly to the vehicle manufacturer’s specifications for refrigerant type and amount to prevent damaging the AC system or violating environmental regulations.
- Be Aware of Pressure Levels: Understand the pressure levels in the AC system, as exceeding the recommended levels can cause components to fail or even explode, posing serious safety risks.
- Disconnect Battery: Before starting any work on the AC system, disconnect the vehicle battery to prevent any electrical accidents or shorts while handling the components.