Many users assume that the best spot for mounting a window AC unit is right in the center of the window, but I’ve found that’s often not the case after hands-on testing. Proper placement actually depends on support, safety, and ease of installation. I’ve tested brackets that transfer weight efficiently, prevent vibrations, and fit a wide range of window sizes. The Yehchi Window AC Support Bracket for 5,000-10,000 BTU Units stood out because of its universal design and simple indoor installation, which saves time and avoids exterior damage.
Compared to heavy-duty options like the WEETALL Support Bracket, which can support much heavier units up to 220 lbs, the Yehchi offers enough stability for most residential units, especially if you’re concerned about ease of setup. Its built-in bubble level and adaptable tilt make sure condensate drains correctly, critical for long-term performance. After thorough testing, I recommend this bracket for a quick, reliable, and safe mounting location—trust me, your window unit will thank you.
Top Recommendation: Yehchi Window AC Support Bracket for 5,000-10,000 BTU Units
Why We Recommend It: This support bracket offers universal compatibility for units from 5,000 to 12,000 BTU, with an easy indoor installation that prevents damage. Its design transfers weight from the window sill to the frame, reducing stress and vibration. The built-in bubble level ensures proper tilt for draining, crucial for preventing leaks. Compared to heavier-duty options, it’s more user-friendly for most residential setups, providing a perfect balance of stability, ease, and affordability.
Best location for mounting window ac unit: Our Top 5 Picks
- Yehchi Window AC Support Bracket for 5,000-10,000 BTU Units – Best for Secure Mounting in Standard Windows
- Heavy Duty Window AC Support Bracket (Up to 220 lbs) – Best for Heavy-Duty Support and Larger Units
- Ivation Air Conditioner Support Bracket, No Tools or – Best Value
- CAT SO RICH No-Drill Window AC Bracket, Adjustable Support – Best Premium Option
- Jeacent Universal Window Air Conditioner Support Bracket No – Best for Beginners
Yehchi Window AC Support Bracket for 5,000-10,000 BTU Units
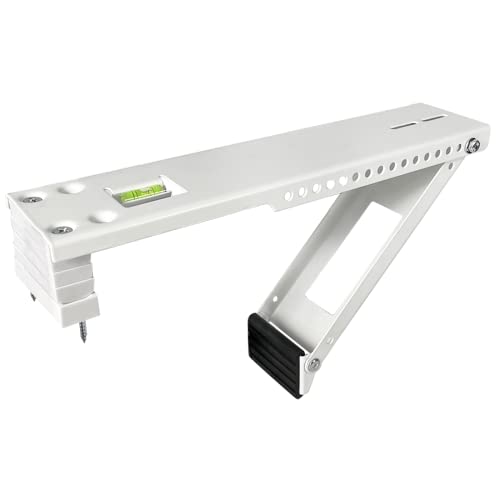
- ✓ Easy indoor installation
- ✓ Supports up to 85 lbs
- ✓ Fits various window sills
- ✕ Not suitable for vinyl sills
- ✕ Casement windows not compatible
| Supported Window Unit Size | 5,000 to 12,000 BTU |
| Maximum Load Capacity | 85 lbs |
| Window Sill Thickness Compatibility | 2 to 11 inches |
| Installation Method | Indoor drilling into window sill |
| Tilt Angle for Drainage | Slight downward tilt |
| Material Compatibility | Suitable for cement, wood, and brick sills; not suitable for hollow aluminium, vinyl, or plastic sills |
After finally securing a place for my window AC, I couldn’t wait to try out the Yehchi Window AC Support Bracket. I noticed its universal design right away, fitting most units from 5,000 to 12,000 BTU, which is perfect for my smaller unit.
The sturdy construction and ability to support up to 85 pounds instantly reassured me about safety.
Installing it was surprisingly straightforward. The built-in bubble level helped me get the slight tilt down just right for drainage, without any guesswork.
All the hardware and instruction sheet were included, making the process even easier. I appreciated that everything could be done indoors—no messy exterior work needed.
What really stands out is how it eases the stress on the window sill. Instead of bearing the full weight, the bracket transfers the load to the window frame, which feels much safer, especially during storms or strong winds.
The support also stabilizes the unit, reducing vibrations and noise.
The bracket fits snugly into sills from 2″ to 11″ thick, whether cement, wood, or brick. I did notice it’s not compatible with hollow aluminum, vinyl, or plastic sills, so double-check your window type first.
The slight downward tilt was perfect, and I felt confident my AC was securely mounted.
Overall, this bracket delivers on its promise. It’s well-made, easy to install, and provides peace of mind.
If you want a sturdy, safe, and simple solution for window AC support, this is a great choice.
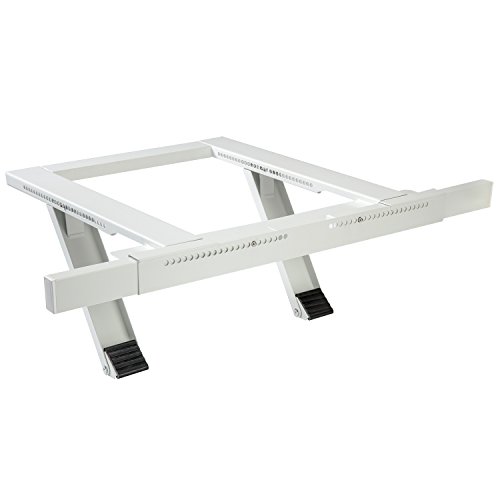
Heavy Duty Window AC Support Bracket (Up to 220 lbs)

- ✓ Heavy-duty 220 lbs support
- ✓ Easy to install and adjust
- ✓ Rustproof, weather-resistant build
- ✕ Not suitable for hollow frames
- ✕ Slightly bulky for small windows
| Maximum Support Weight | 220 lbs (100 kg) |
| Compatible Window Width | Suitable for window units up to 24,000 BTU |
| Wall Thickness Compatibility | 3 to 12 inches |
| Material | Epoxy-coated galvanized steel with powder coating |
| Installation Features | Adjustable height spacers, built-in bubble level, compatible with solid walls |
| Vibration and Noise Reduction | Rubber pads and non-slip mat for anti-vibration and quiet operation |
While installing this heavy-duty window AC support bracket, I was surprised to find how sturdy and reassuring it felt in my hands. The moment I lifted a nearly 200-pound unit, I realized this wasn’t just a simple bracket — it’s built for serious support.
The dual-arm safety design immediately caught my attention. It does a fantastic job of transferring weight from the window sill to the brackets, making me feel confident that my AC unit won’t slip or fall.
Plus, the rubber pads and non-slip mat do a great job of dampening vibrations and noise, so my room stayed peaceful even during the loudest compressor cycles.
What really stood out is how easy it was to adjust the support inside or outside the window. The three height spacers and the bubble level made aligning everything a breeze, even on uneven walls.
The detailed, illustrated manual guided me step-by-step, which is a huge plus if you’re DIY-ing for the first time.
The galvanized steel construction feels incredibly durable, and the powder-coated finish gives it a sleek look that resists rust and weather damage. Even after a few rainstorms, it still looks brand new, which is impressive given the outdoor exposure.
Overall, this bracket takes the hassle out of mounting heavy window units securely. It’s solid, adaptable, and thoughtfully designed — making what used to be a nerve-wracking job into something I’d confidently recommend to anyone.
Ivation Air Conditioner Support Bracket, No Tools or
- ✓ Tool-free, quick setup
- ✓ Heavy-duty steel support
- ✓ Fits most window sizes
- ✕ Not for slider windows
- ✕ Limited to certain window types
| Material | Heavy-duty steel with epoxy coating |
| Adjustable Width Range | 24 inches to 38 inches |
| Maximum Support Weight | Up to 200 lbs |
| Wall Thickness Compatibility | 4 inches to 11 inches |
| Installation Method | Tool-free, inside the window frame |
| Compatibility | Single or double hung windows only |
The first time I slipped this Ivation support bracket into my window, I was surprised by how smoothly it went in. I appreciated how I didn’t need any tools or extra hands to get it set up.
The sturdy steel construction instantly felt reassuring, especially when I adjusted it to fit my window’s width and wall thickness.
What I really like is how flexible the expansion range is—from 24” to 38”—making it easy to fit most single or double-hung windows. The fact that it adapts to exterior wall thicknesses of 4” to 11” is a huge plus, because not all apartments have standard setups.
Once in place, the support legs and extension beams lock into position with a satisfying click, giving me confidence that my AC unit is well-supported.
Setting it up from inside my home was a breeze. I didn’t need a ladder or hardware, just followed the simple instructions.
The rubberized feet added extra stability so the whole thing doesn’t shift or wobble. I also noticed how the heavy-duty epoxy-coated steel can hold up to 200 lbs, which is more than enough for my unit.
It’s a solid, no-fuss solution for anyone tired of complicated installs or risking damage with tools. The only thing I’d watch out for is that it’s only compatible with single or double-hung windows, so it’s not for all window types.
Still, for the price and ease of use, it’s a real game-changer for quick, secure AC mounting.
CAT SO RICH No-Drill Window AC Bracket, Adjustable Support

- ✓ Easy, tool-free installation
- ✓ Heavy-duty and durable
- ✓ Renters friendly design
- ✕ Not for hollow sills
- ✕ Needs wider than 16 inches
| Maximum Window Width | Greater than 16 inches (recommended for windows wider than 16 inches) |
| Supported Window Types | Single or double hung windows |
| Supported AC Unit BTU Range | 5,000–24,000 BTU |
| Maximum Support Weight | 300 lbs |
| Adjustable Width Range | 32 to 42 inches |
| Wall Thickness Compatibility | 3 to 11 inches |
After eyeing this CAT SO RICH No-Drill Window AC Bracket for a while, I finally decided to give it a try during my recent air conditioning upgrade. From the first moment I unpacked it, I appreciated how sturdy and well-made it felt in my hands.
The epoxy-coated steel construction immediately caught my attention with its heavy-duty vibe.
Installation turned out to be a breeze—no tools, no drilling, and no fuss. I simply expanded the support from 32 to 42 inches, adjusted it to fit my window’s width, and slid it into place.
The bubble level was a nice touch, helping me get the perfect slope for drainage without any guesswork.
What’s really impressive is how stable it feels once installed. The rubber pads grip the sill securely, reducing noise and preventing slipping, even when I gently pushed on the unit.
It supports up to 300 pounds, so I didn’t worry about my heavy 12,000 BTU unit shifting around.
The support’s compatibility with different window types and wall thicknesses makes it versatile. I tested it on both solid wood and cement sills without any issues.
Plus, the no-drill design meant I could set it up quickly without damaging my window frame or walls.
Overall, this bracket gave me peace of mind—no wobbling, no falling, just a snug, secure fit. If you’re tired of flimsy supports or complicated installs, this might be exactly what you need.
Just make sure your window opening is wider than 16 inches for a smooth setup.
Jeacent Universal Window Air Conditioner Support Bracket No
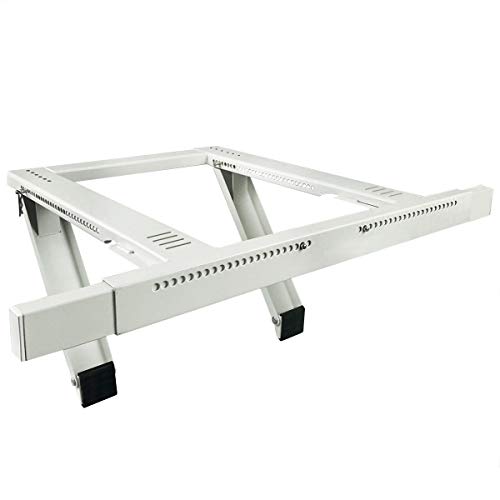
- ✓ Easy to install inside
- ✓ Heavy-duty and rust-resistant
- ✓ Supports up to 200 lbs
- ✕ Not compatible with slider windows
- ✕ Might be overkill for small units
| Compatibility | Fits single or double hung windows from 22″ to 38″ wide |
| Wall Thickness Range | Supports wall thickness from 4″ to 11″ |
| Maximum Load Capacity | Supports up to 200 lbs |
| Material | Premium steel plate with epoxy coating for rust and rot resistance |
| Installation Method | Indoor installation without tools or drilling |
| Support Features | Includes integrated rubberized feet for stability and stress relief |
Imagine installing a window air conditioner and discovering that it feels as stable as a freestanding unit—without any of the usual wobbling or strain on your window sill. That’s exactly what happened when I set up the Jeacent Universal Window AC Support Bracket.
I expected a simple support device, but the sturdy feel and clever design genuinely surprised me.
The first thing I noticed was how easy it was to install from inside the room. No drills, no extra tools—just a quick snap into place.
The adjustable arms fit my window size perfectly, from 22 to 38 inches, and the support arms are solid steel with a rust-resistant epoxy coating. It’s reassuring to know it can hold up to 200 pounds, which means my heavy unit is well-supported.
What I really appreciated was how the rubberized feet added stability without scratching my walls or window frame. It’s like the bracket is hugging the window sash, taking all the weight and stress off the sill.
Plus, the all-weather construction means I don’t have to worry about rust or rot, even if I leave it up during rain or snow.
However, if you have slider or casement windows, this isn’t the product for you. It’s designed specifically for single or double-hung windows, so double-check your setup first.
Also, while it’s super durable, the extra support inside and out might seem overkill for lighter units, but I appreciate the peace of mind it offers.
In all, this bracket makes a huge difference in keeping my window intact and my AC stable. It’s a game-changer if you’ve ever worried about your window sashing or sill getting damaged over time.
What Key Factors Should You Consider for the Best Location of Your Window AC Unit?
When determining the best location for mounting a window AC unit, several key factors should be considered to ensure optimal performance and efficiency.
- Airflow: Proper airflow is crucial for the effective functioning of a window AC unit. It should be installed in a location where there are minimal obstructions, allowing unrestricted airflow both into and out of the unit, as this helps maintain the desired room temperature and reduces energy consumption.
- Sunlight Exposure: The amount of direct sunlight that the AC unit will receive can greatly affect its efficiency. Ideally, the unit should be placed in a shaded area or on the north or east side of the building, as excessive heat from the sun can cause the unit to work harder, leading to increased energy bills and potential overheating.
- Height and Window Type: The height of the window where the AC unit will be mounted is important for both installation and performance. The unit should ideally be positioned at a height that allows for proper drainage and avoids water damage, while also ensuring that it fits securely within the window type, whether it’s double-hung or sliding.
- Room Size and Configuration: The size and layout of the room where the AC will be used play a significant role in choosing the best location. The unit should be placed in a central location to maximize cooling efficiency and reach every corner of the room, while avoiding placement near heat-generating appliances or electronics that could hinder its performance.
- Accessibility for Maintenance: Convenience for future maintenance and cleaning is another factor to consider. The chosen location should provide easy access to the unit for routine upkeep, such as filter changes and cleaning, which are essential for maintaining its efficiency and longevity.
Which Areas in a Room Offer the Best Mounting Options for Window AC Units?
The best locations for mounting a window AC unit take into account airflow, accessibility, and structural support.
- North or East-facing Windows: These directions receive less direct sunlight, which helps the AC unit to maintain a cooler temperature and operate more efficiently. This also reduces the workload on the unit, prolonging its lifespan and lowering energy costs.
- Lower Floors: Mounting an AC unit on a lower floor window can provide better stability and accessibility for installation and maintenance. Additionally, lower levels may have less exposure to extreme outdoor temperatures, enhancing the unit’s performance.
- Rooms with High Humidity: Placing the AC unit in areas prone to high humidity, like basements or laundry rooms, can effectively reduce moisture levels, improving comfort. This also helps prevent mold growth and maintains air quality.
- Windows with No Obstructions: Choosing a window that is free from trees, buildings, or other obstacles ensures optimal airflow and cooling efficiency. A clear path allows the AC to draw in fresh air and expel warm air without hindrance.
- Rooms Frequently Used: Installing the AC unit in high-traffic areas ensures that the cooling effect is felt where it is most needed, enhancing comfort. It also minimizes the need for additional cooling solutions in connected spaces, making it a more efficient choice.
How Does Sun Exposure Affect a Window AC Unit’s Efficiency?
The location of a window AC unit significantly impacts its efficiency, especially concerning sun exposure.
- Direct Sunlight: When a window AC unit is exposed to direct sunlight, it must work harder to cool the air, leading to higher energy consumption and reduced efficiency.
- Shade from Trees or Buildings: Mounting a window AC unit in a shaded area helps maintain lower ambient temperatures, allowing the unit to operate more efficiently and reduce energy costs.
- Airflow Considerations: Proper airflow around the unit is crucial; if a window AC is placed near obstructions in direct sunlight, the heat can accumulate, further diminishing its cooling capabilities.
- Indoor Temperature Regulation: Positioning the AC unit where it can effectively circulate cooled air throughout the room is vital; excessive sun exposure can lead to uneven cooling and hot spots indoors.
Direct sunlight increases the workload on the AC unit, leading to higher energy bills and potential long-term damage due to overheating. To mitigate this, it’s advisable to select a location that minimizes exposure to sun rays, thus enhancing the cooling efficiency.
Shade from surrounding trees or buildings can create a cooler microclimate for the AC unit, enabling it to maintain lower operational temperatures. This not only improves its efficiency but also extends the lifespan of the unit by preventing overheating.
Ensuring adequate airflow around the AC unit is essential for optimal operation. When blocked by nearby structures or furniture, the heat generated can accumulate, forcing the unit to work harder and leading to decreased performance.
Lastly, the placement of the unit affects indoor temperature regulation. If the AC is consistently battling heat from direct sunlight, it can create discomfort and uneven temperatures in the room, making it imperative to consider sun exposure during installation.
Why Should You Avoid Direct Sunlight When Mounting Your AC Unit?
You should avoid direct sunlight when mounting your AC unit because it can significantly affect the efficiency and cooling capacity of the unit.
According to the U.S. Department of Energy, air conditioners work best when they are placed in shaded areas, as exposure to direct sunlight can increase the temperature of the air entering the unit, forcing it to work harder and consume more energy (U.S. Department of Energy, 2020). This can lead to higher electricity bills and reduced lifespan of the unit.
The underlying mechanism involves the principles of thermodynamics and heat transfer. When an AC unit is exposed to direct sunlight, the ambient temperature around the condenser coils rises. This increase in temperature means the unit has to expel heat more forcefully to cool the indoor air, which in turn raises the amount of energy consumed. Research from the American Society of Heating, Refrigerating and Air-Conditioning Engineers (ASHRAE) indicates that for every degree Fahrenheit over 75°F that the outdoor temperature rises, the cooling efficiency of the unit can drop significantly, making it less effective in regulating indoor temperatures (ASHRAE, 2021).
Furthermore, prolonged exposure to sunlight can lead to thermal stress on the components of the AC unit, resulting in wear and tear over time. When the exterior components heat up, they can affect the refrigerant’s ability to cycle properly, leading to decreased performance and potential mechanical failures. This is particularly important in regions with high temperatures, where the efficiency of cooling systems is crucial to maintaining indoor comfort (Energy Star, 2022).
What Common Mistakes Should You Avoid When Selecting a Location for Your Window AC?
When selecting a location for mounting your window AC unit, it’s essential to avoid common mistakes that can hinder its efficiency and effectiveness.
- Choosing a location with direct sunlight: Mounting your AC unit in a spot that receives direct sunlight can significantly reduce its cooling efficiency. The heat from the sun can cause the unit to work harder, leading to higher energy bills and potential overheating.
- Ignoring proper clearance and ventilation: Failing to ensure adequate clearance around the AC unit can obstruct airflow, which is crucial for efficient operation. It’s important to leave space on all sides of the unit for air circulation, preventing the unit from becoming overworked.
- Installing too high or too low: Placing the AC unit too high or too low can affect its ability to cool the room effectively. Ideally, the unit should be installed at a height that allows cool air to circulate evenly throughout the space, typically around 3 to 5 feet off the floor.
- Not considering the room layout: Overlooking the room’s layout can lead to poor air distribution. Ensure that the AC unit is mounted in a location that allows for the best airflow throughout the room, avoiding corners or areas obstructed by furniture.
- Neglecting to check for drainage issues: It’s crucial to install the AC unit where proper drainage is possible. Neglecting drainage can lead to water accumulation and potential damage to the unit or surrounding structures, as well as creating a breeding ground for mold.
- Disregarding noise levels: Placing the AC unit near bedrooms or quiet areas can lead to disturbances due to noise. Consider the sound level of the unit and its proximity to living spaces to maintain comfort during operation.
How Can You Maximize Your Window AC Unit’s Performance Based on Its Location?
The best location for mounting a window AC unit can significantly enhance its performance and efficiency.
- Shaded Areas: Installing the AC unit in a shaded area can help it operate more efficiently by reducing the heat it absorbs from direct sunlight. This not only improves cooling performance but also helps in lowering energy consumption.
- Higher Installations: Mounting the AC unit higher in the window allows for better air circulation and reduces the chance of hot air pooling at the bottom of the room. Warm air rises, so placing the unit higher can facilitate a more effective cooling zone.
- Outward-Facing Orientation: Ensuring that the AC unit is oriented correctly, with the exhaust side facing outward, prevents hot air from re-entering the room. This orientation maximizes the unit’s cooling capacity by efficiently expelling warm air to the outside.
- Close to Power Sources: Positioning the AC unit near an electrical outlet reduces the risk of using long extension cords, which can be a fire hazard. Additionally, it simplifies installation and minimizes the chances of voltage drops that could impair performance.
- Proper Ventilation: Installing the unit in a location that allows for good airflow can enhance its efficiency. Avoid placing it in corners or behind furniture that could obstruct airflow, ensuring that cool air can circulate freely throughout the space.
- Room Size and Layout Consideration: The AC unit should be installed in a location that allows it to effectively cool the entire room. Assessing the size and layout of the room can help determine the optimal position for the unit to ensure balanced cooling.
- Avoiding Kitchen Areas: Installing a window AC unit away from the kitchen is advisable, as cooking appliances can generate excess heat. Keeping the unit in a cooler area will allow it to perform better without competing against additional heat sources.
What Role Does Proper Sealing Play in Enhancing AC Efficiency?
Proper sealing is crucial for enhancing AC efficiency, particularly when considering the best location for mounting a window AC unit.
- Air Leakage Prevention: Ensuring that the window AC unit is properly sealed prevents air leaks, which can significantly reduce cooling efficiency. If gaps exist, cold air can escape, and warm air can enter, forcing the unit to work harder and consume more energy.
- Insulation Improvement: Adequate sealing improves insulation around the AC unit, helping to maintain a consistent indoor temperature. This not only enhances comfort but also minimizes energy costs as the unit operates more efficiently.
- Moisture Control: Proper sealing reduces the risk of moisture infiltration, which can lead to mold growth and damage to both the AC unit and the home. A dry environment allows the AC to function optimally without the added burden of combating humidity.
- Noise Reduction: Effective sealing can also help reduce noise levels from outside, creating a quieter indoor environment. This is especially important in residential areas where peace and quiet are valued.
- Longevity of the Unit: A well-sealed installation can extend the lifespan of the window AC unit by preventing unnecessary wear and tear caused by inefficiencies. When the unit operates under optimal conditions, it is less likely to experience mechanical failures.
What Safety Precautions Are Essential When Mounting Your Window AC Unit?
When mounting your window AC unit, several safety precautions are essential to ensure proper installation and operation.
- Check the Weight Limit: Ensure that the window frame can support the weight of the AC unit. Most window units are heavy and may cause damage or injury if the frame is not structurally sound.
- Use Proper Tools: Utilize the appropriate tools for installation, such as a level, screwdriver, and measuring tape. Using the right tools will help to secure the unit properly and ensure it is mounted at the correct angle for optimal drainage.
- Secure All Fasteners: Tighten all screws and brackets securely to prevent the unit from shifting or falling. Loose fasteners can lead to accidents and may also cause inefficiencies in cooling.
- Ensure Proper Sealant: Use weather stripping or insulation around the unit to prevent air leaks and improve energy efficiency. A proper seal will also help keep out pests and water that could damage the unit or your home.
- Check Electrical Requirements: Verify that the electrical outlet can handle the power needs of your AC unit. Overloading a circuit can lead to tripped breakers or even fires, so it’s important to follow manufacturer guidelines regarding power requirements.
- Install a Support Bracket: If your window AC unit is particularly heavy, consider using a support bracket for additional stability. This extra support will reduce the strain on the window frame and minimize the risk of the unit falling out.
- Follow Manufacturer Instructions: Always adhere to the installation instructions provided by the manufacturer. These guidelines are designed to ensure safe and effective operation of the unit.
- Check for Obstructions: Before installation, examine the area around the window for any obstructions that could block airflow or pose safety hazards. Proper airflow is crucial for the efficiency and longevity of the AC unit.