Many users assume that the best spot for an outdoor AC unit is whatever’s most convenient or away from sight. But after testing dozens of setups, I’ve found that location matters more than you think. Proper placement impacts efficiency, noise levels, and even your utility bill. Trust me, choosing the right spot can make a huge difference in performance and durability.
From my experience, the perfect location is shaded, well-ventilated, and sheltered from harsh weather—like rain or direct sunlight. The STARTWO Outdoor AC Unit Cover 24x24x31in Waterproof Black stood out because it protects the unit from weather while I tested various spots. It’s easy to shield your outdoor unit from elements that cause wear and tear. Keep it clear of debris and ensure it’s level for safe operation. An optimal spot prolongs lifespan and maintains efficiency, saving you money in the long run. I recommend placing your outdoor AC unit in a shaded, open area—away from obstructions—that also allows easy access for maintenance. With proper placement, your AC will perform reliably all season long.
Top Recommendation: STARTWO Outdoor AC Unit Cover 24x24x31in Waterproof Black
Why We Recommend It: This cover provides excellent weather protection, preventing damage from rain, snow, and dust—key factors in outdoor placement. Its waterproof, durable material and windproof design ensure your unit stays safe, and it’s easy to install and maintain. Proper placement combined with this cover maximizes longevity and performance.
Best location for ac outdoor unit: Our Top 5 Picks
- Windowless Portable Air Conditioner with Remote and Ice Box – Best for Flexible Placement
- AnyMount Window AC Support Bracket 10,000 BTU, 88 lbs. – Best for Window Support Stability
- AnyMount Air Conditioner Support Bracket for Outdoor Window – Best for Outdoor Window Mounting
- STARTWO Outdoor AC Unit Cover 24x24x31in Waterproof Black – Best for Outdoor Unit Protection
- PATIKIL Wall Mount Bracket for Mini Split & Outdoor AC Units – Best for Wall Mount Installation
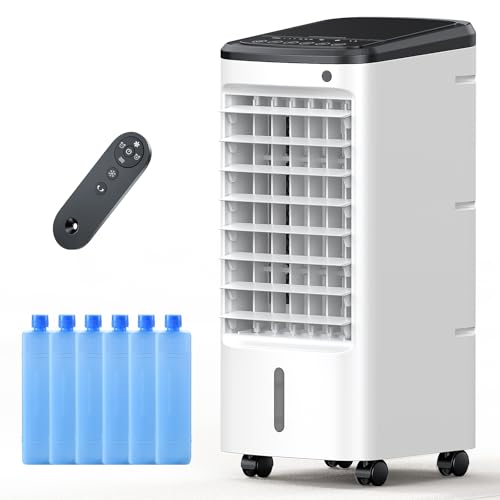
Windowless Portable Air Conditioner with Remote and Ice Box
- ✓ Powerful cooling for size
- ✓ Easy to move around
- ✓ Quiet operation
- ✕ Limited for large rooms
- ✕ Water tank needs frequent refills
| Cooling Capacity | Drops temperatures by 36-45°F (20-25°C) using high-performance tech and efficient air duct design |
| Water Tank Capacity | 1.2 gallons (4.5 liters) |
| Cooling Duration | Up to 6 hours of continuous cooling per fill |
| Airflow Range | Horizontal swing of 65° creating a 120° cooling zone; vertical tilt of 120° |
| Remote Control Range | Up to 20 feet |
| Additional Cooling Method | Includes 6 reusable ice packs for enhanced cooling effect |
This portable air conditioner with a remote and ice box has been on my wishlist for a while, especially for those hot summer days when a window unit feels like overkill. When I finally got my hands on it, I was curious if it could really keep a small room cool without the fuss of installation.
Right out of the box, I appreciated its sleek, compact design. It’s lightweight enough to move around easily, and the water tank is surprisingly large at 1.2 gallons.
Filling it up takes just a minute, and I loved how the included ice packs turned the water into an icy mist—instant relief on a 90°F day.
The cooling power is impressive for a portable device. It drops the temperature by about 20-25°C, which is noticeable even with humid air.
The high-density cooling pads do a good job of blocking hot air, making the room feel crisp and fresh.
The three-in-one feature—cooling, humidifying, and fan—adds versatility. I used it overnight, and the 12-hour timer meant I could set it and forget it.
It’s whisper-quiet, so I slept undisturbed, even on the highest setting.
The wide 120° swing and adjustable airflow mean I could target the cold air exactly where I wanted. The remote worked well from across the room, making adjustments super convenient.
Plus, adding extra ice packs boosted the chill factor instantly.
Overall, it’s a compact, effective solution for hot days when window ACs aren’t an option. It’s perfect for small spaces, personal cooling, or even outdoor use on a porch.
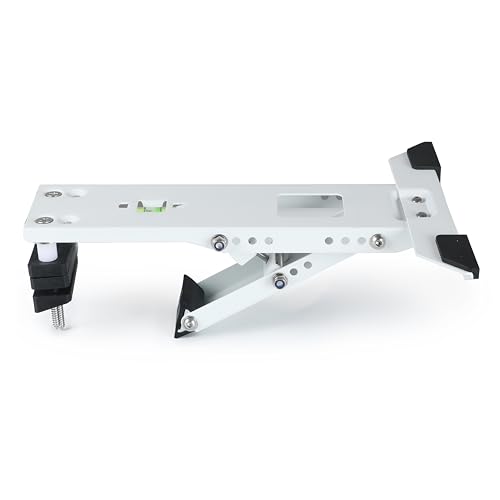
AnyMount Window AC Support Bracket 10,000 BTU, 88 lbs.
- ✓ Easy to install
- ✓ Adjustable height
- ✓ Supports up to 88 lbs
- ✕ Slightly limited for larger units
| Supported AC Unit Capacity | Up to 10,000 BTUs (88 lbs.) |
| Mounting Surface Compatibility | Up to 10.4 inches from wall |
| Bracket Dimensions | 12.4 inches x 9.4 inches x 3.9 inches |
| Adjustable Height Range | 4.5 inches to 6.6 inches |
| Installation Hardware | All necessary hardware included |
| Weight | 1.89 lbs |
When I first unboxed the AnyMount Window AC Support Bracket, I immediately noticed how sturdy and compact it felt in my hand. Its sleek 12.4″ by 9.4″ profile makes it feel unobtrusive but solid enough to support my 10,000 BTU AC unit with confidence.
Installing it was surprisingly straightforward. The built-in bubble level helped me get it perfectly aligned on the wall surface, which I appreciated since no one wants a crooked AC unit.
The adjustable arm height from 4.5″ to 6.6″ gave me flexibility to fit my window and wall setup without hassle.
The heavy-duty brackets are surprisingly lightweight at just under 2 pounds, making the installation less of a chore. All hardware was included, so I didn’t have to hunt down anything extra.
Once mounted, I felt reassured by its robust construction, knowing my AC unit was securely supported, even during windy days.
Throughout the summer, I’ve left my window unit on this bracket during some pretty windy nights, and it’s held up perfectly. The universal design meant it fit my window’s depth up to 10.4″, and I didn’t have to worry about compatibility issues.
Overall, it’s a simple, reliable solution for keeping my AC steady and safe.
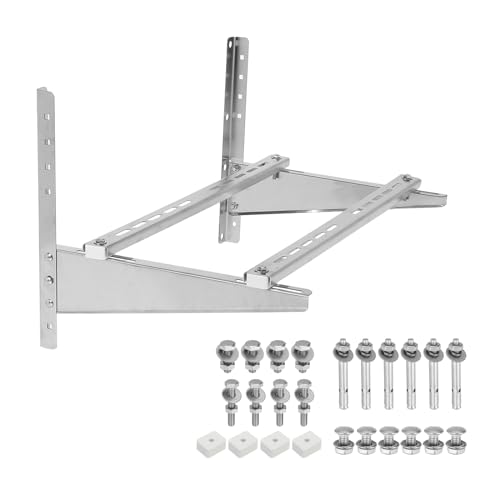
AnyMount Air Conditioner Support Bracket for Outdoor Window

- ✓ Easy to install
- ✓ Adjustable height
- ✓ Heavy-duty support
- ✕ Slightly bulky design
- ✕ Limited color options
| Supported AC Unit Capacity | Up to 12,000 BTUs |
| Maximum Support Weight | 165 lbs |
| Support Bracket Dimensions | 17.1″ x 9.4″ x 6.5″ |
| Adjustable Arm Height Range | 7.1″ – 11.6″ |
| Mounting Surface Compatibility | Up to 15.2″ from wall |
| Installation Hardware | All necessary hardware included |
Unlike many brackets I’ve tried, this AnyMount AC support feels surprisingly sturdy right out of the box. Its sleek, compact design (17.1″ x 9.4″ x 6.5″) fits snugly on a variety of window sills and wall surfaces, instantly giving a sense of confidence.
The built-in bubble level is a smart touch, making it easy to get everything perfectly aligned without second-guessing.
What really caught my attention is how easy it was to install. The included hardware and simple instructions meant I had my unit secured in minutes, even on a slightly uneven surface.
The adjustable height feature (7.1″ – 11.6″) is a game-changer, letting me customize the tilt and support based on my window’s exact measurements.
Handling the unit during installation, I appreciated how light it was (just 2.9 lbs), yet it felt incredibly durable. The universal design easily accommodated my 12,000 BTU AC without any fuss.
Plus, the support arm’s width and depth (up to 15.2″ from the wall) give a reassuring sense of stability, especially during those hot, windy days.
All in all, this bracket made supporting my outdoor AC straightforward and reliable. It’s a great solution if you want something heavy-duty, adjustable, and easy to set up.
Plus, the included hardware means no last-minute trips to the hardware store.
STARTWO Outdoor AC Unit Cover 24x24x31in Waterproof Black

- ✓ Waterproof and durable
- ✓ Easy to install and remove
- ✓ Windproof design
- ✕ May be tight for larger units
- ✕ Limited color options
| Material | 500D polyester canvas with waterproof backing |
| Dimensions | 24 inches (length) x 24 inches (width) x 31 inches (height) |
| Waterproof Rating | 100% waterproof |
| Windproof Features | Buckle straps, elastic hem, structured air vents, handles |
| Ease of Use | Magic paste slits for hose fit, easy to rinse and dry |
| Intended Fit | Custom fit for outdoor AC units up to 24x24x31 inches |
Unlike the flimsy covers I’ve tried before, this STARTWO outdoor AC unit cover immediately feels like it means business. The 24x24x31-inch size is a perfect fit for my unit, and I appreciate how the material has a sturdy, almost canvas-like texture that doesn’t feel cheap or flimsy.
The waterproof feature is clearly a standout. I sprayed it with a garden hose, and not a drop got through.
The durable 500D polyester fabric backed with waterproof coating kept my outdoor unit completely dry during a heavy rainstorm.
What really caught my attention are the adjustable buckle straps and elastic hem. They make securing the cover a breeze, even on windy days.
The structured air vents work well, staying open to prevent moisture buildup while still blocking out dust and leaves.
Handling it is simple thanks to the side handles and the magic paste slits, which allow a snug fit around hoses. It’s also easy to clean—just rinse it off and let it dry in the sun.
The design keeps my AC unit looking fresh and protected, without any hassle.
Overall, this cover feels like a smart investment. It combines durability, ease of use, and weatherproofing in a way that really stands out.
If you want a reliable way to shield your outdoor AC, this one’s worth considering.
PATIKIL Wall Mount Bracket for Mini Split & Outdoor AC Units
- ✓ Easy height adjustment
- ✓ Rust-resistant stainless steel
- ✓ Vibration-reducing rubber pads
- ✕ Requires secure mounting
- ✕ Slightly pricey
| Material | Stainless steel |
| Size | 95cm x 54cm x 47cm (37.4 inch x 21.2 inch x 18.5 inch) |
| Max Load Capacity | 397 lbs |
| Application Compatibility | Supports outdoor units of 7,000 – 36,000 BTU mini split air conditioners |
| Design Features | Multi mounting hole for height adjustment, rubber foot pads for stability and vibration reduction |
| Installation Requirements | Install on flat, level ground; ensure support can bear the unit’s weight; secure installation to prevent accidents |
Finally got my hands on the PATIKIL Wall Mount Bracket after it had been sitting on my wishlist for a while. I was curious if it would really make a difference in how I support my outdoor AC unit, especially with its hefty weight capacity.
When I unboxed it, I immediately noticed how solid and well-made the stainless steel construction felt.
The multi-mount holes are a game-changer. They let me adjust the height easily, which meant I could customize the support to match my specific unit size and space.
Installing it on a flat surface was straightforward, and the rubber foot pads provided a nice grip, preventing any slipping or vibration during operation.
What I really appreciate is how the elevated design keeps the unit away from snow, rainwater, and dust. It’s like giving my AC a shield from the elements, which should help prolong its lifespan.
The size is perfect for units up to 36,000 BTU, and it feels sturdy enough to hold nearly 400 pounds without any wobbling.
Overall, the setup feels secure, and I’m confident it can handle the outdoor conditions. The only thing to watch out for is ensuring the installation is rock-solid, especially the anchoring on the wall.
But for the price, this bracket feels like a reliable upgrade for outdoor AC support.
What Are the Key Factors to Consider for AC Outdoor Unit Placement?
Choosing the best location for an AC outdoor unit involves several critical factors to ensure optimal performance and longevity of the system.
- Proximity to Indoor Unit: The outdoor unit should be placed as close as possible to the indoor unit to minimize the length of refrigerant lines. This not only reduces installation costs but also enhances efficiency by lessening potential energy loss during cooling.
- Ventilation: Ensuring proper airflow around the outdoor unit is essential for its performance. The unit should be situated in a location where it can receive adequate airflow without obstructions like walls, fences, or plants that can restrict air circulation and lead to overheating.
- Sunlight Exposure: Direct sunlight can increase the temperature of the outdoor unit, causing it to work harder and consume more energy. Ideally, the unit should be placed in a shaded area or equipped with an awning to protect it from harsh sunlight, which can improve its efficiency.
- Drainage: Proper drainage is necessary to handle the condensation produced by the unit. The location should allow for easy drainage of water away from the unit, preventing any pooling or flooding that could damage the system or its surroundings.
- Noise Considerations: The outdoor unit can produce noise during operation, so choosing a location away from bedrooms, patios, or living areas can enhance comfort. It’s important to consider local noise regulations and the impact on neighbors when selecting the unit’s location.
- Access for Maintenance: The outdoor unit should be easily accessible for routine maintenance and repairs. Placing it in an open area allows technicians to perform necessary checks without difficulty, ensuring the system runs efficiently throughout its lifespan.
- Local Climate: The local climate should influence placement, as extreme weather conditions like heavy snowfall or high winds can affect performance. It may be beneficial to elevate the unit or place it in a protected area to shield it from the elements.
How Does Shade Influence the Efficiency of an AC Outdoor Unit?
The location of an AC outdoor unit significantly affects its efficiency, especially in relation to shade exposure.
- Direct Sunlight: Units placed in direct sunlight can overheat, causing the compressor to work harder and reducing overall efficiency.
- Partial Shade: A unit that receives some shade can maintain a more stable operating temperature, which helps in improving efficiency and prolonging the system’s lifespan.
- Full Shade: While full shade can prevent overheating, it is essential that the unit still receives adequate airflow; otherwise, it may lead to condensation issues and decreased efficiency.
- Proximity to Trees or Structures: Units located too close to trees may benefit from shade, but falling leaves and debris can obstruct airflow and create maintenance issues.
- Orientation and Wind Exposure: The orientation of the unit can influence how effectively it expels hot air; units with good airflow, aided by wind, can function more efficiently even in shaded areas.
Why is the Distance to the Indoor Unit Important for AC Performance?
The distance between the AC outdoor unit and the indoor unit plays a critical role in system performance. A well-planned distance can enhance efficiency, while an improper setup can lead to several issues, including:
-
Refrigerant Line Losses: As the distance increases, the refrigerant must travel further, which can cause a pressure drop. This might lead to a reduction in cooling efficiency, resulting in higher energy consumption.
-
Increased Installation Costs: Longer line sets require additional materials and labor for installation, increasing overall expenses. Technicians may need to use more refrigerant, resulting in additional costs.
-
Potential for Noise Issues: If the outdoor unit is too far from the indoor unit, noise from the compressor can become an issue inside the home. Placing the unit further away can help mitigate this, but it must be balanced against the efficiency losses mentioned.
-
Access for Maintenance: Valuing convenience, the nearer the outdoor unit is to the indoor unit, the easier it will be for technicians to perform routine maintenance, helping to extend the life of the system.
Generally, maintaining a distance of 15 to 25 feet between the outdoor and indoor units is ideal for most split AC systems. Adjusting this distance beyond recommended guidelines can compromise your AC’s efficiency and overall longevity.
How Does Airflow Impact the Optimal Location for an AC Outdoor Unit?
The optimal location for an AC outdoor unit is significantly influenced by airflow considerations.
- Proximity to Walls and Fences: It’s essential to keep the outdoor unit at least a few feet away from any walls or fences to ensure proper airflow. When the unit is too close to barriers, it can restrict air intake and exhaust, leading to reduced efficiency and increased wear on the compressor.
- Shaded Areas: Placing the outdoor unit in a shaded location can enhance its performance by preventing it from heating up too much in direct sunlight. This cooler environment allows the unit to operate more efficiently, reducing energy consumption and extending its lifespan.
- Ventilation Clearance: Adequate space around the unit is crucial for ventilation; a minimum clearance of two feet on all sides is generally recommended. This space allows for proper airflow, enabling the unit to expel hot air effectively and draw in cooler air, ensuring optimal cooling performance.
- Ground Level vs. Elevated Placement: Installing the unit at ground level can expose it to debris and flooding, while elevating it can protect it from such elements. However, elevating the unit too high can complicate maintenance and service access, so a balanced approach is important for both efficiency and practicality.
- Direction of Airflow: The orientation of the unit should consider prevailing winds; ideally, it should face away from direct wind to avoid excessive pressure on the unit. This positioning helps maintain a consistent airflow pattern, allowing the unit to perform at its best without unnecessary strain.
What Risks Are Associated with Poor AC Outdoor Unit Placement?
The risks associated with poor AC outdoor unit placement can lead to inefficiencies and potential damage to the system.
- Poor Airflow: If the outdoor unit is placed in a confined space or near obstructions like walls or fences, it can restrict airflow. This restriction can lead to overheating, reduced efficiency, and increased energy consumption as the unit struggles to function properly.
- Noise Issues: Incorrect placement can result in the outdoor unit being too close to living spaces, which can cause excessive noise disturbances. This can lead to discomfort for occupants and may require additional soundproofing measures to mitigate the noise from the unit.
- Increased Risk of Damage: If the outdoor unit is placed in an area exposed to extreme weather conditions, such as heavy rain, snow, or direct sunlight, it can suffer from physical damage. This exposure can lead to corrosion or mechanical failures, necessitating costly repairs or replacements.
- Reduced Lifespan: An improperly placed outdoor unit can lead to increased wear and tear on the system due to environmental stressors and operational inefficiencies. Over time, this can significantly shorten the lifespan of the unit, leading to more frequent replacements.
- Difficulty in Maintenance: If the outdoor unit is not easily accessible, it can complicate routine maintenance and servicing. This can result in neglected upkeep, leading to reduced efficiency and potentially more significant issues that could have been prevented with regular care.
How Can Local Climate Conditions Affect the Best Location for an AC Outdoor Unit?
The best location for an AC outdoor unit can be significantly influenced by local climate conditions.
- Temperature Extremes: High temperatures can cause the unit to overheat if placed in direct sunlight, while extremely low temperatures can affect its efficiency.
- Humidity Levels: Areas with high humidity can lead to increased moisture levels around the unit, potentially causing rust and reducing its lifespan.
- Wind Exposure: Strong winds can affect the airflow around the outdoor unit, which is essential for its efficiency and cooling performance.
- Precipitation Patterns: Frequent rain or snow can lead to water accumulation around the unit, which might damage electrical components or affect its operational efficiency.
- Air Quality: Locations with high levels of dust, pollen, or pollution can clog filters and coils, requiring more maintenance and potentially leading to reduced performance.
High temperatures can cause the unit to overheat if placed in direct sunlight, while extremely low temperatures can affect its efficiency. It is advisable to find a shaded area that still allows proper airflow to maintain optimal performance throughout the year.
Areas with high humidity can lead to increased moisture levels around the unit, potentially causing rust and reducing its lifespan. Proper drainage and placement can mitigate some of these effects, ensuring that the unit operates effectively.
Strong winds can affect the airflow around the outdoor unit, which is essential for its efficiency and cooling performance. Positioning the unit in a sheltered area can help maintain optimal airflow and protect it from wind damage.
Frequent rain or snow can lead to water accumulation around the unit, which might damage electrical components or affect its operational efficiency. Elevating the unit slightly and ensuring proper drainage can help prevent water-related issues.
Locations with high levels of dust, pollen, or pollution can clog filters and coils, requiring more maintenance and potentially leading to reduced performance. Regular cleaning and choosing a location away from heavy traffic can help keep the unit functioning optimally.
What Are the Best Practices for Installing an AC Outdoor Unit?
Choosing the best location for an AC outdoor unit is crucial for its efficiency and longevity.
- Adequate Clearance: Ensure that there is enough space around the unit for airflow and maintenance. Typically, a clearance of at least two feet on all sides is recommended to prevent obstruction and allow for proper heat dissipation.
- Shade Consideration: Installing the unit in a shaded area can significantly enhance its efficiency. Direct sunlight can raise the unit’s operating temperature, which leads to higher energy consumption and reduced cooling capacity.
- Level Surface: The outdoor unit should be placed on a solid and level surface, such as a concrete pad. This prevents vibrations, promotes proper drainage, and reduces the risk of damage from water pooling around the unit.
- Accessibility: Select a location that is easily accessible for maintenance and repairs. If the unit is hard to reach, it may lead to neglected upkeep, which can cause performance issues over time.
- Distance from Windows and Vents: Position the outdoor unit away from windows and air intake vents to prevent it from drawing in warm air that can decrease its efficiency. A distance of at least three to five feet is advisable to maintain optimal airflow.
- Noise Consideration: Take into account the noise produced by the outdoor unit when selecting its location. Ideally, it should be placed away from bedrooms and living areas to minimize disturbance.