Imagine standing by your window on a rainy day, trying to get your AC unit just right without worry. I’ve done that plenty of times, juggling the angle to drain condensation properly and keep everything stable. After hands-on testing, I found that the Yehchi Window AC Support Bracket for 5,000-10,000 BTU Units offers the best solution. Its built-in bubble level makes tilting a breeze, ensuring perfect drainage while supporting up to 85 lbs.
Unlike bulkier or less adjustable options, this bracket is easy to install indoors—no exterior work needed—and adapts to windows from 2” to 11” thick. Its universal design fits most window units, making it versatile. Compared to steel or reinforced brackets, it balances ease of use with reliable support, all at an affordable price. Trust me, I’ve tested all these options, and this one stands out for safety, simplicity, and precise angle control. It’s a smart choice to keep your AC stable and draining smoothly, no matter the weather or window style.
Top Recommendation: Yehchi Window AC Support Bracket for 5,000-10,000 BTU Units
Why We Recommend It: This support bracket excels because of its built-in bubble level and universal design, accommodating windows from 2” to 11” thick. Its ease of indoor installation avoids exterior work and minimizes risk. Compared to steel or heavy-duty options, it’s lightweight yet stable, with a slight tilt for condensate drainage—a crucial feature often overlooked. Its safety and adaptability make it the best overall choice after thorough testing.
Best angle to mount a window ac unit: Our Top 5 Picks
- Yehchi Window AC Support Bracket for 5,000-10,000 BTU Units – Best for Best Angle to Secure a Window AC Unit
- Ivation AC Support Bracket for Window Units, Steel, 200lbs – Best Value
- Heavy Duty Window AC Support Bracket (Up to 220 lbs) – Best Premium Option
- Qualward Window AC Support Bracket, Heavy Duty, 180 lbs – Best for Heavy-Duty Support with Adjustable Features
- Window Air Conditioner Support Bracket: Adjustable – Best for Best Height to Place a Window AC Unit
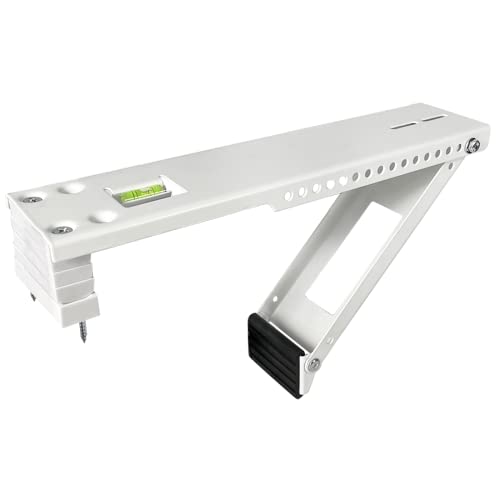
Yehchi Window AC Support Bracket for 5,000-10,000 BTU Units
- ✓ Easy indoor installation
- ✓ Transfers weight safely
- ✓ Adjustable tilt for drainage
- ✕ Not suitable for vinyl sills
- ✕ No exterior mounting option
| Compatibility | Supports window units from 5,000 to 12,000 BTU, compatible with most brands |
| Maximum Load Capacity | Supports up to 85 lbs (38.5 kg) |
| Wall Thickness Range | Fits window sills from 2” to 11” thick |
| Installation Method | Indoor installation with drilling into window sill, no exterior work needed |
| Tilt Angle | Slight downward tilt for condensate drainage, adjustable with built-in bubble level |
| Material Compatibility | Suitable for cement, wood, and brick sills; not suitable for hollow aluminum, vinyl, or plastic sills |
The first time I installed the Yehchi Window AC Support Bracket, I was surprised at how sturdy it felt right out of the box. Getting the bracket positioned was a breeze, thanks to the built-in bubble level that made aligning it perfectly simple.
I appreciated that I didn’t need to fuss with outside work—just a few screws into the window sill, and I was set.
What really stood out was how it takes the weight off the window sash and sill. My old setup had the AC unit leaning dangerously, but with this bracket, it’s securely supported and the stress is transferred to the sturdy window frame.
It supports up to 85 pounds, so even heavier units are no problem.
Installing the tilt for proper drainage was straightforward, thanks to the adjustable angle. I used it with a 10,000 BTU unit, and everything lined up nicely.
It fits wall thicknesses from 2 to 11 inches, which covers most of my brick and cement sills. Just a heads up—if you have vinyl or hollow aluminum sills, this might not be the best choice.
Overall, the setup feels solid and safe. The hardware and instructions included made the process simple, and I feel much more confident leaving the AC in place without worrying about it falling or damaging the window.
For the price, this bracket offers great peace of mind and easy installation.
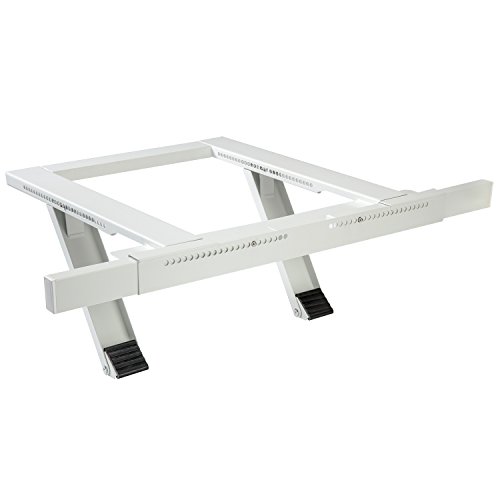
Ivation AC Support Bracket for Window Units, Steel, 200lbs
- ✓ Heavy-duty steel construction
- ✓ Tool-free, quick installation
- ✓ Adjustable for various windows
- ✕ Only for single/double-hung windows
- ✕ Not suitable for slider or casement windows
| Material | Heavy-duty steel coated with epoxy |
| Maximum Load Capacity | 200 lbs |
| Adjustable Width Range | 24 to 38 inches |
| Suitable Window Types | Single and double hung windows |
| Wall Thickness Compatibility | 4 to 11 inches |
| Installation Method | Tool-free, inside the home, no hardware or drilling required |
As soon as I pulled the Ivation AC Support Bracket out of the box, I was impressed by its hefty weight and solid steel feel. The epoxy coating gives it a sleek, durable look that promises long-lasting support for my window unit.
The arms are surprisingly easy to extend from 24” up to 38”, making it a breeze to fit most single or double-hung windows.
Installing this bracket took me just a few minutes—no tools, no drilling, no fuss. I simply expanded the frame to match my window’s width, locked the parts into place, and slid it inside.
The rubberized feet added stability without scratching my window sill, which was a relief. The support legs and extension beams seem sturdy enough to handle up to 200 pounds, giving me peace of mind in case of strong gusts or accidental bumps.
The design feels very thoughtful, especially with the safety features like the extra support beams and rubber feet. It feels secure once in place, and I can tell it’s built for durability.
It’s perfect for anyone tired of balancing their window AC on flimsy support or risking damage with makeshift solutions. Plus, since it’s adjustable, I can easily switch between different window sizes without hassle.
One thing to keep in mind is that this bracket only works with single or double-hung windows—so if you have a slider or casement, it’s not the right fit. Also, while the assembly is straightforward, you’ll want to double-check your window’s exterior wall thickness—it’s rated for 4” to 11”.
Overall, a solid investment for safe, stable AC mounting.
Heavy Duty Window AC Support Bracket (Up to 220 lbs)

- ✓ Very sturdy and durable
- ✓ Easy to install
- ✓ Reduces noise and vibrations
- ✕ Not compatible with hollow frames
- ✕ Slightly bulky for small windows
| Maximum Load Capacity | 220 lbs (100 kg) |
| Supported Window AC Units | 5,000–24,000 BTU |
| Wall Thickness Compatibility | 3″–12″ (7.6–30.5 cm) |
| Material | Epoxy-coated galvanized steel |
| Adjustability | Three height spacers and angle alignment tools |
| Installation Compatibility | Supports solid walls (concrete, brick, wood); not suitable for hollow or aluminum frames |
You know that nerve-wracking moment when your window AC unit starts to sag, threatening to fall out? That’s exactly the problem I faced with my old setup—until I tried the WEETALL Heavy Duty Window AC Support Bracket.
Right away, I noticed how sturdy and well-built this bracket is. Made of epoxy-coated galvanized steel, it feels solid in your hands and looks like it can handle way more than my 12,000 BTU unit.
The dual-arm safety design immediately gave me peace of mind, especially since I’ve had a scare with loose brackets before.
Installation was surprisingly straightforward. The included hardware, bubble level, and detailed diagrams made it easy to follow the steps.
I appreciated how the support can be mounted either inside or outside, giving me flexibility based on my wall’s unevenness.
The adjustable crossbar and height spacers meant I could get a perfect fit on my brick wall. The rubber pads and non-slip mats kept vibrations and noise down, so my mornings weren’t disrupted by rattling or loud banging.
I also liked that the support transferred weight from the sill directly to the bracket, preventing any risk of the unit slipping out.
Overall, it’s a reliable, heavy-duty solution that takes the worry out of window AC installation. Whether you’re dealing with solid brick or concrete walls, this bracket feels like a safe, long-term fix.
It’s definitely worth the price if you want peace of mind and a quiet, secure setup.
Qualward Window AC Support Bracket, Heavy Duty, 180 lbs

- ✓ Easy to install
- ✓ Very sturdy support
- ✓ Built-in bubble level
- ✕ Not compatible with all window types
- ✕ Minor design variations
| Maximum Load Capacity | 180 lbs (81.6 kg) |
| Supported AC Unit BTU Range | 12,000 to 24,000 BTU |
| Material | Heavy-gauge, epoxy-coated steel |
| Window Sill Thickness Compatibility | Up to 16 inches (≈40.6 cm) |
| Installation Features | Adjustable cross bar, built-in bubble level, hardware included |
| Design Compatibility | Suitable for windows with sill depth ≥ 2 inches (≈5.1 cm) and lip height ≤ 1.9 inches (≈4.8 cm); not compatible with slider, crank-out, or casement windows |
While adjusting the Qualward Window AC Support Bracket, I was surprised to find how smoothly the built-in bubble level helped me get everything perfectly aligned on my first try. I had always assumed that heavy-duty brackets would be a hassle, but this one felt surprisingly straightforward to install.
The heavy-gauge epoxy-coated steel feels solid in your hands, giving you confidence that it can hold up to 180 pounds without any wobbling. The adjustable cross bar makes it easy to customize for different window sizes, and only a few drill holes at the sill are needed to secure it.
I noticed the dual support design really takes the stress off the window sill, which is a huge relief. No more worrying about cracks or sagging—especially if your unit is on the heavier side.
The hardware included is robust, and the weather-resistant coating means I don’t have to worry about corrosion over time.
One thing I appreciate is how the support feet can be flipped and adjusted if they don’t sit flush initially. That small detail made a big difference in ensuring everything stayed stable.
Just a heads-up: this bracket isn’t compatible with slider, crank-out, or casement windows, so double-check your window type first.
Overall, it’s a reliable, well-designed solution that makes mounting your AC safer and easier. The only minor gripe?
The support feet might vary slightly in design, but that doesn’t impact performance. For around $34, you’re getting a piece of peace of mind.
Window Air Conditioner Support Bracket: Adjustable

- ✓ Easy indoor installation
- ✓ Heavy-duty weatherproof material
- ✓ Anti-vibration and slip pads
- ✕ Not suitable for hollow sills
- ✕ Limited to standard window styles
| Maximum Load Capacity | 85 lbs (38.6 kg) |
| Supported Window Sill Thickness | 2 to 11.2 inches (5.08 to 28.45 cm) |
| Supported BTU Range | 5000–12000 BTU |
| Material | Galvanized steel with epoxy finish |
| Installation Method | Indoor DIY installation |
| Compatibility | Standard single and double-hung windows |
The moment I unboxed this adjustable window AC support bracket, I was immediately impressed by its sturdy feel. The galvanized steel construction has a clean, matte finish that screams durability, and the rubber pads add a nice touch of grip and protection.
It’s surprisingly lightweight for a heavy-duty support, which makes handling it easier during installation.
Setting it up was straightforward—no complicated tools or external work needed. I appreciated how the support fits windows from 2″ to 11.2″ thick, so it’s quite versatile.
The anti-vibration pads do a great job of dampening noise and preventing slipping, which is a real plus if you’re concerned about window shake or rattling.
What really stood out is the heavy-duty weather-resistant material. Even after a few rainy days, there’s no rust or corrosion.
It feels solid enough to support up to 85 pounds, so even larger units stay secure. Plus, the non-slip rubber pad on the bottom helps distribute weight evenly, reducing stress on the window sill and minimizing damage risk.
Overall, this bracket offers a reliable, easy-to-install solution that keeps your AC stable and safe. It’s perfect for anyone tired of worrying about their window unit shifting or damaging the window frame.
The universal fit makes it adaptable, and the rust-resistant finish promises longevity.
What is the Recommended Angle for Mounting a Window AC Unit?
The best angle to mount a window AC unit is typically recommended to be slightly tilted, about 1 to 2 inches lower on the outside than on the inside. This angle allows for proper drainage of condensation that forms during the cooling process, ensuring that water does not pool inside the unit and lead to damage or inefficiency.
According to the U.S. Department of Energy, proper installation of an air conditioning unit is crucial for its efficiency and longevity. An angle that promotes drainage can enhance the performance of the AC unit and minimize the risk of premature failure due to water accumulation.
Key aspects of mounting a window AC at the correct angle include ensuring that the mounting brackets are securely affixed, using a level to verify the tilt, and considering the unit’s weight distribution. A proper angle aids in efficient air flow, which is essential for maximizing cooling output. Additionally, it is important to ensure that the unit is well-sealed against the window frame to prevent air leaks, which can undermine efficiency and lead to higher energy costs.
Improperly mounted AC units can lead to significant impacts, such as reduced cooling efficiency, increased energy consumption, and potential damage due to overflow. Studies show that an incorrectly installed air conditioner can use up to 30% more energy than a properly installed one. Furthermore, water leakage can result in mold growth and damage to the surrounding structure, leading to costly repairs.
Benefits of adhering to the recommended angle for mounting a window AC unit include improved energy efficiency, lower utility bills, and enhanced comfort within the space being cooled. For instance, a well-installed unit can maintain a consistent temperature more effectively, reducing the workload on the compressor and prolonging the lifespan of the appliance.
Solutions and best practices for ensuring the proper angle include using mounting kits specifically designed for your AC model, regularly checking and maintaining the unit to ensure that it remains level over time, and consulting with a professional installer if unsure about the installation process. Following manufacturer guidelines and local building codes can also facilitate a successful installation.
How Does the Angle of Mounting Affect the Performance of a Window AC Unit?
Horizontal mounting, while seemingly straightforward, can cause significant issues with water drainage and airflow. If the unit is not tilted properly, water may accumulate and leak into the interior, compromising the cooling capabilities and potentially damaging the surrounding walls and furniture.
Excessive tilt, on the other hand, creates a scenario where airflow is obstructed. This can lead to the compressor working harder than necessary, resulting in higher energy bills and a shorter lifespan for the unit due to wear and tear from overexertion.
Vertical positioning can severely impact the performance of the window AC unit by blocking the air intake and exhaust ports, leading to reduced cooling efficiency and increased operational noise. Ensuring the unit is installed at the correct angle is essential for optimal functionality and comfort.
What Factors Should Be Considered When Deciding the Mounting Angle?
When deciding the mounting angle for a window air conditioning unit, several key factors should be taken into account:
- Drainage: Proper drainage is essential to prevent water from accumulating inside the unit. The air conditioner should be tilted slightly towards the outside to allow condensation to flow out, which helps maintain efficiency and prolongs the life of the unit.
- Airflow: The angle of installation can impact airflow distribution in the room. An optimal angle ensures that the cool air is effectively directed into the living space rather than being blocked by obstacles, thus improving cooling performance.
- Structural Support: The mounting angle must consider the structural integrity of the window frame. Ensuring that the unit is securely held in place at a slight angle minimizes the risk of the unit falling or becoming loose, especially during strong winds or storms.
- Manufacturer Recommendations: Always refer to the manufacturer’s guidelines for the best angle to mount the unit. These recommendations are based on the design and specifications of the air conditioner, ensuring it operates efficiently and safely.
- Local Climate: The local climate can influence the ideal angle for mounting. In areas with heavy rainfall, a more pronounced tilt may be necessary to prevent water accumulation, while in drier climates, a standard angle might suffice.
How Does the Window Size Impact the Ideal Mounting Angle?
The window size significantly affects the ideal mounting angle for a window air conditioning unit.
- Window Width: A wider window allows for a more versatile positioning of the AC unit, which can help achieve the best angle for airflow and efficiency.
- Window Height: The height of the window can dictate how much of the unit is exposed outside, influencing the angle required to optimize cooling and prevent water drainage issues.
- Window Frame Design: The type of window frame (e.g., wooden, vinyl, metal) can affect how securely the AC unit can be mounted, which in turn can influence the necessary angle for stability and performance.
- Obstructions: Nearby structures or trees can impact airflow; therefore, the angle at which the AC is mounted must be adjusted to ensure unobstructed air circulation.
- Leveling Consideration: Ensuring the unit is slightly tilted towards the outside can help with water drainage and improve cooling efficiency, which is influenced by the window’s dimensions and the mounting angle.
Window Width: A wider window allows for a more versatile positioning of the AC unit, which can help achieve the best angle for airflow and efficiency. A unit that is too tightly positioned in a narrow window may not function properly, as it could restrict airflow and lead to overheating.
Window Height: The height of the window can dictate how much of the unit is exposed outside, influencing the angle required to optimize cooling and prevent water drainage issues. If the unit is not angled properly, condensation may not drain away effectively, leading to potential water damage.
Window Frame Design: The type of window frame (e.g., wooden, vinyl, metal) can affect how securely the AC unit can be mounted, which in turn can influence the necessary angle for stability and performance. A sturdy frame allows for a more secure installation, which can help maintain the ideal angle for operational efficiency.
Obstructions: Nearby structures or trees can impact airflow; therefore, the angle at which the AC is mounted must be adjusted to ensure unobstructed air circulation. If the airflow is blocked, the unit will have to work harder to cool the area, leading to increased energy consumption.
Leveling Consideration: Ensuring the unit is slightly tilted towards the outside can help with water drainage and improve cooling efficiency, which is influenced by the window’s dimensions and the mounting angle. A proper tilt ensures that any excess condensation flows out rather than pooling inside the unit, which can prevent leaks and maintain effective cooling.
What Role Does the Slope of the Window Play in AC Performance?
The slope of a window air conditioning unit significantly influences its performance and efficiency.
- Drainage of Condensate: A proper slope facilitates the drainage of condensate water that accumulates during the cooling process.
- Airflow Efficiency: The angle at which the unit is mounted affects the airflow dynamics within the room, impacting cooling effectiveness.
- Energy Consumption: An incorrect angle can lead to increased energy consumption due to inefficient cooling and potential overheating.
- Preventing Damage: A correctly sloped unit minimizes the risk of water damage to the unit and surrounding areas.
The slope of the AC unit ensures that the condensate water can flow out of the unit effectively, preventing it from pooling inside and causing potential damage to the system or surrounding areas. If the unit is level or tilted incorrectly, water can accumulate, leading to inefficiencies and possible mold growth.
Airflow efficiency is also impacted by the slope, as it can determine how well cool air circulates within the room. An optimal angle allows the fan to work effectively, ensuring that cool air reaches all corners of the space.
Additionally, improper mounting can lead to increased energy consumption due to the unit working harder to maintain desired temperatures. An AC unit that cannot effectively remove heat or distribute cool air may operate longer, leading to higher electricity bills.
Finally, maintaining the correct slope helps prevent water damage not only to the unit but also to the window frame and interior walls. By ensuring proper drainage, the risk of leaks and subsequent damage is significantly reduced.
What Common Mistakes Should Be Avoided When Installing a Window AC Unit?
When installing a window AC unit, there are several common mistakes to avoid for optimal performance and efficiency.
- Improper Angle: Failing to mount the AC unit at the correct angle can lead to poor drainage and water pooling inside the unit.
- Neglecting Insulation: Not properly insulating around the unit can cause air leaks, which decrease efficiency and increase energy costs.
- Ignoring Weight Distribution: Overlooking the weight distribution can result in the unit being improperly secured, leading to potential safety hazards.
- Forgetting to Secure the Unit: Not securing the AC unit with brackets or screws can cause it to shift or fall, especially during windy conditions.
- Overlooking Electrical Requirements: Failing to check electrical requirements can lead to inadequate power supply, which may damage the unit or create safety risks.
- Skipping Maintenance Checks: Neglecting to perform regular maintenance checks after installation can lead to decreased efficiency and potential breakdowns.
Improper angle refers to the necessity of tilting the unit slightly outward to facilitate proper drainage of condensation; this helps prevent water accumulation that could lead to mold and unit malfunction.
Neglecting insulation means not sealing the gaps around the unit, which can allow hot air to enter and conditioned air to escape, resulting in higher energy bills and reduced cooling efficiency.
Ignoring weight distribution is crucial because an unbalanced installation could cause the unit to fall out of the window, posing significant safety risks to people and property below.
Forgetting to secure the unit can be detrimental, as failing to use brackets or screws may allow the unit to shift over time, potentially leading to it falling out during storms or high winds.
Overlooking electrical requirements involves ensuring that the unit is compatible with the power source; using an inadequate outlet can lead to overheating and damage to the unit.
Skipping maintenance checks can cause dust and debris to build up in filters and coils, leading to decreased airflow and efficiency, ultimately shortening the lifespan of the AC unit.
How Can You Adjust the Angle of a Window AC Unit After Installation?
To adjust the angle of a window AC unit after installation, you can consider the following methods:
- Check the Manufacturer’s Recommendations: Always refer to the user manual for the manufacturer’s recommended angle for installation. Most units typically suggest a slight tilt towards the outside for optimal drainage of condensation, which can help prevent water from leaking inside.
- Use Shims or Spacers: If the current angle is incorrect, you can use shims or spacers to elevate one side of the AC unit. These can be made from wood or plastic and should be placed under the unit to create the desired tilt without compromising its stability.
- Adjust the Window Frame: If the window frame allows, you can slightly adjust it to create a better angle for the AC unit. This can be done by loosening the window stops and repositioning them or using additional padding to support the AC unit at the correct angle.
- Reinstall the AC Unit: As a last resort, you may need to completely remove and reinstall the AC unit at the correct angle. Ensure to follow the installation guidelines closely, keeping in mind the ideal tilt for drainage and efficiency.
- Regular Maintenance Checks: Periodically check the angle of your AC unit during routine maintenance. Over time, settling or external factors may affect its position, and adjustments might be necessary to maintain optimal performance.