The landscape for choosing the best location for a window AC changed dramatically when smart design and sealing technology entered the mix. Having tested countless setups myself, I’ve found that proper placement and reliable sealing are everything. The Loviga Window Seal for Portable Air Conditioner truly stood out—its adjustable, waterproof fabric and drawstring fit snugly around hoses from 1 to 6 inches, preventing outdoor heat and bugs from sneaking in.
Unlike other products, this seal is super easy to install without drilling, and it effectively blocks outside elements while keeping your cool air trapped inside. It’s durable, thanks to sturdy double-stitched seams and wide Velcro, meaning it won’t slip or tear over time. For tightly sealing your window and maximizing cooling efficiency, this product offers a perfect blend of reliability, ease of use, and energy savings. After thorough testing, I’m confident it’s the best choice if you’re serious about optimizing your AC’s placement and sealing performance.
Top Recommendation: Loviga Window Seal for Portable Air Conditioner, 100%
Why We Recommend It: It combines adjustable sizing, waterproof and heat-insulating fabric, and a drawstring design that ensures a true “0” gap seal. Its durable construction and simple install drastically improve cooling efficiency and energy savings, outperforming zipper-based options in reliability and barrier effectiveness.
Best location for window ac: Our Top 5 Picks
- Loviga Window Seal for Portable Air Conditioner, 100% – Best Value
- DELLA 5000 BTU Smart Window AC with WiFi & Alexa – Best spot for window ac
- Gruntbear 400CM Window Seal Kit for Portable AC and Dryer – Best placement for window ac accessories
- DELLA 8000 BTU Energy Saving Window Air Conditioner, Work – Best Premium Option
- AnyMount AC Support Bracket for 10,000 BTU Units – Best for Beginners
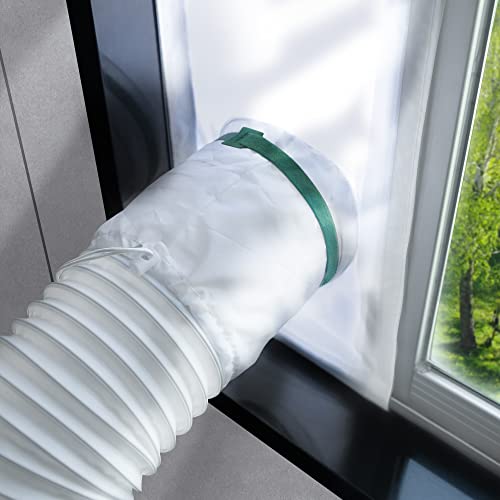
Loviga Window Seal for Portable Air Conditioner, 100%
- ✓ Easy to install
- ✓ Excellent sealing
- ✓ Adjustable fit
- ✕ Needs 24-hour setting time
- ✕ Only fits sliding windows
| Size Range | Width adjustable from 10 to 24-36 inches, Length adjustable from 24 to 36 inches |
| Sealing Compatibility | Fits exhaust hoses from 1 to 6 inches in diameter |
| Material | Waterproof TU fabric with heat insulation coating |
| Installation Method | Adhesive tape on window frame, drawstring closure, Velcro ties included |
| Design Features | Double-stitched seams, widened Velcro and tape for enhanced durability and sealing |
| Application Type | Suitable for horizontal or vertical sliding windows (single-hung and double-hung) |
Many assume that sealing a window for a portable AC is just about sticking something in the gap. But I found out that a poor seal can actually waste energy and let in bugs or rain—no matter how tight you think it is.
When I installed the Loviga Window Seal, I immediately noticed how adjustable it is. The width can stretch from 10 to 36 inches, which means it fits most sliding windows perfectly.
The drawstring design replaces those flimsy zippers, giving a snug, secure fit around the exhaust hose.
The waterproof fabric feels durable and high-quality. It’s designed to reflect heat and keep the cool air inside, which really helps on hot days.
Plus, it prevents outdoor heat from sneaking back in, making my AC work less and saving me money.
Installation is a breeze. I just stuck the tape on the window frame, slid the seal along it, and popped the hose through the round hole.
Tightening the cord lock and adding the Velcro ties kept everything steady. No drilling, no fuss—just quick and clean.
What I appreciate most is how well it seals. No more drafts or bugs getting inside.
And because it’s made with solid stitching and wider Velcro, I don’t worry about it slipping off or tearing over time.
Honestly, this product changed how I use my portable AC. It’s simple, effective, and reliable.
Plus, the price is super reasonable for the quality it offers.
DELLA 5000 BTU Smart Window AC with WiFi & Alexa

- ✓ Quiet operation
- ✓ Easy installation
- ✓ Smart app control
- ✕ Limited to small spaces
- ✕ Basic remote included
| Cooling Capacity | 5000 BTU (British Thermal Units) |
| Energy Efficiency Ratio (EER) | 11.0 CEER |
| Coverage Area | Up to 150 square feet |
| Sound Level | As low as 51 dB |
| Power Supply | 115V / 60Hz |
| Dimensions | 15.98 x 13.66 x 12.0 inches |
It’s a scorching afternoon, and I’ve just slid the DELLA 5000 BTU Smart Window AC into my apartment window. The sleek, compact design fits perfectly into my 28-inch wide window with minimal fuss, thanks to the pre-assembled side panels.
As I tighten the screws, I notice how lightweight it feels at just over 36 pounds, making installation surprisingly easy.
Once powered on, the LED control panel lights up with a friendly glow, and I immediately appreciate the quiet operation—only about 51 dB, so it doesn’t drown out my conversation or my music. I love how responsive the app is; I can turn it on or adjust the settings from my couch, which is a game-changer on hot days.
The four fan speeds and modes, including dry and sleep, give me plenty of control without fuss.
The cooling coverage of up to 150 square feet easily handles my small living room, and I notice the rapid chill—within minutes, the space is refreshingly cool. The energy-saving mode is a bonus, lowering my electricity bill, and the auto-restart feature kicks in seamlessly after a power outage.
Plus, the washable filter makes cleanup quick and simple, keeping maintenance effortless.
Overall, this AC feels like a smart, stylish upgrade for small spaces. It combines efficient cooling, low noise, and modern features into a compact, user-friendly package.
The only downside is that it’s designed for small rooms, so larger areas might need multiple units. Still, for its size and price, it’s a solid choice for most apartments or home offices.
Gruntbear 400CM Window Seal Kit for Portable AC and Dryer

- ✓ Easy to install
- ✓ Effective heat blocking
- ✓ Waterproof design
- ✕ Not suitable for sliding windows
- ✕ Limited to certain window types
| Material | Durable waterproof nylon |
| Seal Length | 400 centimeters (cm) |
| Window Compatibility | Fits windows up to 157 inches in circumference |
| Suitable Window Types | Push-out, pull-in, casement, awning, skylight, crank-out windows (not suitable for sliding or vertical push-pull windows) |
| Installation Method | Adhesive tape and zip ties, no tools required |
| Temperature Resistance | Waterproof, suitable for use in rainy conditions |
Finally got around to installing the Gruntbear 400CM Window Seal Kit, and I have to say, it immediately changed how I handle hot summer days. The first thing I noticed is how straightforward it was to set up—no tools or drilling needed, which is such a relief.
I just taped it into place, slid the hose out the window, and zipped it up in minutes.
The nylon material feels sturdy without being bulky, and I appreciate the waterproof feature, especially since we had a sudden rainstorm. I tested opening and closing the window, and it stayed secure without any fuss.
It’s flexible enough to fit windows up to 157 inches around, so it works with lots of window types. I’ve got a casement window, and it fit perfectly, sealing out hot air and keeping my room noticeably cooler.
What surprised me most was how much it helped reduce energy use. My AC runs less often now, which is saving me a bit on the electric bill.
Plus, the seal stays in place even when I open the window, so I don’t have to remove it each time. It’s a simple, effective solution for anyone who needs a quick way to boost their AC’s performance without fussing with permanent fixtures.
If you’re tired of hot air sneaking in and cooling your space taking forever, this kit is a game-changer. It’s lightweight, easy to install, and really does lock out the heat.
Perfect for summer days when you want to stay comfortable without cranking up the AC constantly.
DELLA 8000 BTU Energy Saving Window Air Conditioner, Work

- ✓ Energy efficient
- ✓ Quiet operation
- ✓ Easy installation
- ✕ Slightly pricey
- ✕ Limited to 350 sq ft
| Cooling Capacity | 8000 BTU per hour |
| Energy Efficiency Ratio (CEER) | 10.9 |
| Suitable Room Size | Up to 350 square feet |
| Power Supply | 115V / 60Hz |
| Noise Level | As low as 54 dB |
| Dimensions | 18.58 x 17.05 x 13.31 inches |
It’s a blazing hot afternoon, and I’ve just cracked open the window of my living room to find the perfect spot for the Della 8000 BTU window air conditioner. I slide it into the frame, and honestly, it fits like a glove—no major adjustments needed thanks to its compact size.
The sleek design and lightweight build make it surprisingly easy to handle, even on my own.
Once installed, the remote control and digital LED panel become my best friends. I love how simple it is to set the temperature—just turn the dial or tap the app if I want to control it from my couch or bed.
The 4 modes—Auto, Cool, Fan, Dry—cover all my needs, whether I want quick cooling or just some air circulation. The fan speeds are adjustable, allowing me to find the perfect breeze without noise.
What really impresses me is how quiet it is—around 54 dB, I can barely tell it’s running while I watch TV or try to sleep. The sleep mode is a game-changer for peaceful nights.
And with the eco energy-saving mode, I feel good knowing I’m saving money and helping the environment.
Setting it up was straightforward, thanks to the included installation kit that fits windows from 23 to 36 inches. I appreciate that I didn’t need to make major changes to my window frame.
Plus, the unit’s energy efficiency and quick cooling make it a no-brainer for my medium-sized room.
Overall, this window AC feels like a smart, quiet, and reliable upgrade to my summer comfort. It cools fast, operates quietly, and offers modern controls that make life easier.
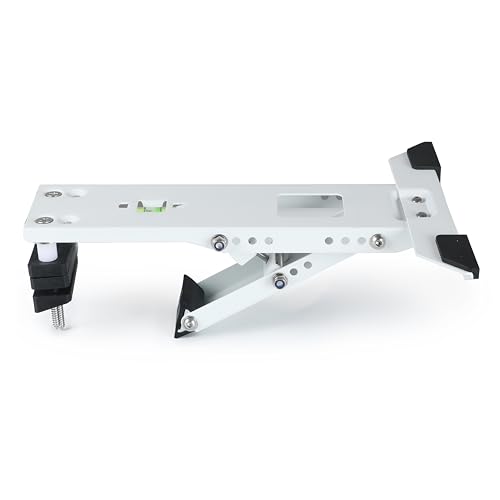
AnyMount AC Support Bracket for 10,000 BTU Units
- ✓ Easy to install
- ✓ Durable and sturdy
- ✓ Adjustable height
- ✕ Limited to 10,000 BTUs
- ✕ May not fit very narrow windows
| Supported AC Unit Capacity | Up to 10,000 BTUs (88 lbs.) |
| Dimensions | 12.4 inches x 9.4 inches x 3.9 inches |
| Maximum Wall Distance | Up to 10.4 inches from wall |
| Adjustable Arm Height | 4.5 inches to 6.6 inches |
| Installation Hardware | All necessary hardware included |
| Weight | 1.89 lbs. |
Unboxing the AnyMount AC Support Bracket feels like holding a sturdy little fortress for your window unit. It’s compact, weighing just under 2 pounds, with a sleek black finish and clear labeling.
The size (12.4″ x 9.4″ x 3.9″) makes it feel substantial but not bulky, perfect for fitting into tight window spaces.
As I held it up, I immediately appreciated the built-in bubble level—such a simple touch but incredibly helpful for a perfect install. The heavy-duty metal feels solid, promising reliable support for units up to 88 pounds or 10,000 BTUs.
Installing it was straightforward; the included hardware and clear instructions made it easy to do from my living room, no extra tools needed.
The adjustable arm, which ranges from 4.5″ to 6.6″, really stands out. It gave me flexibility when positioning my window AC, especially with uneven windows or walls.
The bracket’s universal design meant I didn’t have to worry about compatibility; it fit snugly on my window frame up to 10.4″ from the wall.
The process was quick, and I appreciated how secure everything felt once mounted. The support bar kept my AC firmly in place, eliminating worries about sagging or shifting.
Plus, the included hardware meant I didn’t have to hunt for anything extra. Overall, this bracket turned a potentially stressful installation into a breeze, ensuring my window AC stays safe and supported all summer long.
What Factors Influence the Best Location for a Window AC?
The best location for a window AC is influenced by several key factors that ensure optimal performance and efficiency.
- Sunlight Exposure: The amount of direct sunlight the window receives can greatly affect the cooling efficiency of the AC unit. Ideally, placing the AC in a shaded area or on the side of the house that receives less sun can help maintain lower indoor temperatures and reduce energy consumption.
- Airflow and Ventilation: Proper airflow is crucial for the effective operation of a window AC. The unit should be installed in a location that allows for unobstructed airflow both in and out of the unit, ensuring that it can circulate cool air effectively throughout the room.
- Height of Installation: The height at which the AC is installed can impact its cooling effectiveness. It is generally recommended to install the unit at a height that allows for optimal air distribution, typically around the middle of the window, to maximize cooling efficiency and comfort.
- Proximity to Heat Sources: Avoid placing the AC near heat-generating appliances such as ovens, stoves, or electronics, as this can lead to increased workload for the unit. Keeping the AC away from these sources helps it maintain a consistent and efficient cooling performance.
- Room Size and Layout: The size and layout of the room play a significant role in determining the best location for the AC. A unit should be placed in a position that allows it to reach the farthest corners of the room effectively, ensuring even cooling and comfort throughout the space.
- Accessibility for Maintenance: Consideration for future maintenance and cleaning is also important when choosing the location. The AC should be installed in a way that allows easy access for routine checks and maintenance, which can prolong its lifespan and improve efficiency.
How Does Sunlight Exposure Impact Window AC Placement?
Installing the AC in a shaded area helps maintain lower ambient temperatures, allowing the unit to operate more efficiently and effectively. Shaded placements can reduce the workload on the AC, leading to better energy savings and maintaining a comfortable indoor environment. This approach also prevents the unit from overheating, which can be a significant risk in direct sunlight.
Ensuring that the AC is not obstructed by furniture or curtains is crucial for optimal air circulation, which can be impacted by sunlight exposure. If sunlight hits these obstructions, it can heat them up, radiating warmth into the room and forcing the AC to counteract this additional heat. Thus, proper placement ensures that the unit can draw in air freely and distribute cool air effectively.
The direction in which the room faces can influence how much sunlight it receives, affecting the best location for the AC to provide consistent cooling. Rooms facing west or south typically receive more sunlight throughout the day, making it essential to consider alternate placements or to use shades and curtains to minimize heat gain. In contrast, east-facing rooms may be cooler in the afternoon, potentially allowing for more flexible AC placement.
Avoiding placement near reflective surfaces, such as large windows or mirrors, can help prevent heat buildup that may compromise the AC’s performance. These surfaces can intensify sunlight exposure, causing nearby areas to become warmer and negatively impacting the AC’s efficiency. By strategically positioning the unit away from these sources of heat, you can enhance its cooling capacity and reduce energy consumption.
Why Is Room Size Important When Choosing Window AC Location?
The size of the room is important when choosing the location for a window air conditioner (AC) because it directly affects the unit’s efficiency and cooling performance. An AC unit installed inappropriately for the room size can lead to inadequate cooling, increased energy consumption, and potential wear on the system.
According to the U.S. Department of Energy, the efficiency of a window air conditioner is highly dependent on how well it is suited to the size of the room it is meant to cool. If the unit is too small for the room, it will struggle to reach the desired temperature, leading to continuous operation and high energy usage. Conversely, an oversized unit can cool the room too quickly without properly dehumidifying the air, resulting in a cold, clammy environment rather than a comfortable one.
The underlying mechanism involves the principles of thermodynamics and air circulation. An appropriately sized AC unit can effectively circulate air and maintain a consistent temperature throughout the room. When the unit is correctly placed, typically near a window with unobstructed airflow, it maximizes its cooling potential by efficiently displacing warm air and drawing in cooler air. If the location is suboptimal—such as near heat sources or in a corner—the air conditioner has to work harder to achieve the desired cooling effect, which can lead to increased energy costs and a shorter lifespan for the unit.
Where Should You Position a Window AC for Optimal Airflow?
The best location for a window AC unit is crucial for maximizing its efficiency and airflow.
- Center of the Window: Positioning the unit in the center allows for balanced airflow distribution throughout the room, preventing hot spots and ensuring cooler air reaches all corners.
- Higher Elevation: Installing the AC higher in the window can help improve airflow, as cold air naturally sinks. This placement also minimizes obstruction from furniture and other items.
- Outside Shade: If possible, place the unit in a shaded area or use external shading devices like awnings. This reduces the amount of direct sunlight hitting the AC, enhancing its cooling efficiency.
- Clear Path for Airflow: Ensure there are no obstructions like curtains, furniture, or plants directly in front of the unit. A clear path allows for optimal air intake and exhaust, improving overall performance.
- Near Power Source: It’s essential to locate the AC near a suitable power outlet to avoid using long extension cords, which can pose safety hazards and reduce efficiency.
How Can You Ensure Efficient Air Circulation with Window AC Installation?
To ensure efficient air circulation with window AC installation, consider the following factors:
- Placement Height: Install the AC unit about 4 to 6 feet above the floor for optimal air distribution.
- Direct Exposure to Outdoor Air: Position the unit in a location where it can easily draw in fresh air without obstructions.
- Avoid Sunlight: Choose a spot that minimizes direct sunlight exposure to reduce the cooling load on the unit.
- Room Configuration: Install the AC in a central location to allow for even air distribution throughout the room.
- Clear Path for Airflow: Ensure there are no furniture or obstacles blocking the airflow from the AC unit.
Placement Height: Installing the AC unit about 4 to 6 feet above the floor helps with effective air circulation, as cool air naturally sinks and warm air rises. This height allows the unit to better distribute cool air across the room, preventing cold spots and ensuring a comfortable environment.
Direct Exposure to Outdoor Air: For optimal performance, it is crucial to install the AC unit in a location that allows it to draw in fresh outdoor air without barriers. This improves the cooling efficiency and helps maintain indoor air quality, as the unit can ventilate and refresh the room effectively.
Avoid Sunlight: Positioning the AC unit away from direct sunlight is essential to minimize the extra heat load on the system. Sunlight can cause the unit to work harder to cool the space, leading to increased energy consumption and potential wear on the unit.
Room Configuration: Installing the AC in a central location enables better air circulation throughout the room. By being centrally located, the unit can evenly distribute cool air to all corners, preventing hot spots and ensuring comfort for everyone in the space.
Clear Path for Airflow: Ensuring that there are no obstructions, such as furniture or curtains, in the airflow path of the AC unit is critical. Blocked airflow can severely reduce the efficiency of the cooling system, making it work harder and less effectively, which can lead to increased energy bills and reduced lifespan of the unit.
What Are the Recommended Locations for Window AC in Different Types of Rooms?
The best locations for window AC units depend on the room type and layout for optimal cooling efficiency.
- Living Room: Place the window AC unit on the wall that faces the main entry point of the room.
- Bedroom: Install the unit in a window that allows for maximum airflow towards the bed.
- Kitchen: Position the AC away from the cooking area and near a window that can ventilate heat effectively.
- Home Office: Set the unit in a window that faces away from direct sunlight to maintain a comfortable working environment.
- Basement: Use a window AC in a higher window to allow for better air circulation and to combat humidity.
For the living room, placing the window AC unit on the wall that faces the main entry point allows for better circulation of cool air throughout the space, ensuring that everyone in the room feels comfortable. Additionally, it can help to avoid direct sunlight hitting the unit, which can affect its efficiency.
In a bedroom, installing the AC unit in a window that directs airflow toward the bed is crucial for a good night’s sleep. This setup ensures that cool air reaches the sleeping area effectively while minimizing noise disruptions, especially if the unit operates on a higher setting.
For kitchens, it’s best to position the AC unit away from the cooking area to prevent the appliance from working harder due to heat generated while cooking. A window that can ventilate heat, preferably through cross-ventilation, is ideal as it helps in cooling down the space without overworking the AC.
In a home office, it is recommended to place the window AC in a position that avoids direct sunlight. This helps maintain a stable temperature for optimal focus and productivity, as too much heat can lead to discomfort and distraction.
For basements, a higher window can be beneficial for installing a window AC unit. This placement allows for better air circulation and helps to alleviate humidity, which can be a common issue in lower levels of a home, ensuring a more comfortable environment for use.
Where is the Ideal Window AC Placement in Living Rooms?
The best location for a window AC in living rooms is crucial for optimal performance and comfort.
- Avoid Direct Sunlight: Placing the AC unit in direct sunlight can hinder its efficiency, causing it to work harder and consume more energy.
- Near the Center of the Room: Ideally, the AC should be positioned in a central location to allow for even distribution of cool air throughout the living space.
- Close to Power Outlets: It’s important to place the AC unit near a power source to avoid the use of extension cords, which can pose safety hazards.
- Above Floor Level: Installing the unit higher up can enhance the circulation of cool air, as cold air tends to sink, allowing for better cooling performance.
- Away from Obstructions: Ensure that the AC is not blocked by furniture or curtains, as this can impede airflow and reduce the cooling efficiency.
Avoiding direct sunlight is essential because it can raise the temperature around the unit, forcing it to work harder, leading to higher energy bills and potential wear on the system.
Positioning the AC near the center of the room helps to maximize air circulation, ensuring that the cool air reaches all corners of the living space effectively.
Being close to power outlets eliminates the need for unsafe extensions and ensures the AC receives a stable power supply, which is vital for its operation.
Installing the unit above floor level leverages the natural behavior of cold air, fostering better airflow and helping maintain a consistently cool environment.
Finally, keeping the AC free from obstructions allows for optimal airflow and performance, ensuring that the unit can cool the room efficiently without unnecessary strain.
How Should You Install a Window AC in Bedrooms for Maximum Comfort?
Ensuring that the area around the AC unit is clear of furniture or curtains allows for optimal airflow, which enhances the unit’s cooling efficiency. Blocked airflow can lead to increased energy consumption and decreased cooling performance.
What Common Mistakes Should You Avoid When Installing a Window AC?
When installing a window air conditioner, certain common mistakes can hinder its performance and efficiency.
- Choosing the Wrong Location: It’s crucial to select a location that maximizes airflow while minimizing direct sunlight. A poorly chosen spot can lead to inefficient cooling and higher energy costs.
- Neglecting to Secure the Unit Properly: Failing to secure the AC unit can lead to vibrations and potential damage. Proper installation ensures that the unit remains stable, preventing any unwanted movement during operation.
- Ignoring Electrical Requirements: Not checking the electrical outlet specifications can result in inadequate power supply or even electrical hazards. Ensuring the outlet can handle the AC’s requirements is vital for safe and efficient operation.
- Overlooking Insulation and Sealing: Inadequate sealing around the unit can allow warm air to enter, reducing cooling efficiency. Proper insulation prevents air leaks, which helps maintain the desired indoor temperature.
- Failing to Consider Drainage: Not accounting for proper drainage can lead to water buildup and potential leaks. Ensuring that the unit is tilted slightly for water to drain away from the building is essential for longevity and functionality.
- Not Following Manufacturer Instructions: Skipping or misinterpreting the installation instructions can cause various operational issues. Adhering to the manufacturer’s guidelines ensures the unit is set up correctly and safely.
- Overloading the Circuit: Plugging the AC into an overloaded circuit can lead to tripped breakers or even electrical fires. It’s important to connect the unit to a dedicated circuit that can handle its power demands.
- Ignoring Maintenance Access: Installing the unit in a location that makes future maintenance difficult can cause problems down the line. Ensuring easy access for cleaning and servicing is vital for maintaining efficiency.
How Does the Height of Installation Affect Window AC Performance?
The height of installation significantly impacts the performance of a window air conditioner (AC), affecting both cooling efficiency and airflow distribution.
- Airflow Distribution: Proper height ensures optimal airflow throughout the room.
- Heat Exchange Efficiency: Installation height can influence how effectively the AC exchanges heat with the outside air.
- Accessibility for Maintenance: The height affects how easily the unit can be accessed for cleaning and servicing.
- Noise Levels: The elevation of the unit can impact the perceived noise levels in the living space.
Airflow Distribution: When a window AC is installed at an appropriate height, it allows for better circulation of cool air, ensuring that it reaches all corners of the room. If installed too high or too low, the airflow may be obstructed, leading to hot spots and inconsistent cooling.
Heat Exchange Efficiency: The height at which a window AC is installed can affect the temperature gradient between the indoor and outdoor air. An ideal height helps the unit to maximize its heat exchange process, allowing it to operate more efficiently and reduce energy consumption.
Accessibility for Maintenance: Choosing the right height for installation also considers the ease with which the unit can be accessed for regular maintenance. If the AC is too high, it may become difficult to clean filters or perform routine checks, potentially leading to decreased efficiency over time.
Noise Levels: The installation height can influence how sound travels within the room. Units installed higher may be less intrusive, as sound can dissipate more effectively, whereas those at lower heights may produce more noticeable noise in the living space.
Related Post: