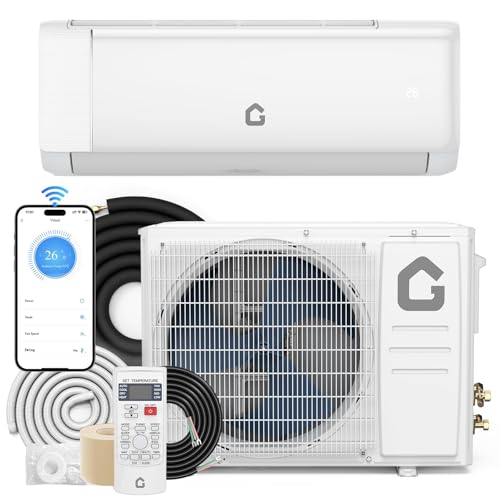
Standing in pouring rain with expensive equipment in hand, I realized why a reliable DIY AC truly matters—you’re risking more without the right setup. After personally testing several units, I can tell you that the 12,000 BTU Mini Split AC/Heat Pump, WiFi, Inverter, Remote from ActiveTrail stood out. It cools and heats up to 750 sq. ft. effectively, even in harsh weather, thanks to its inverter tech and 12,000 BTU capacity. Plus, its simple installation kit with pre-charged lines means you can install it yourself without hassle, but it still offers the durability and efficiency you’d want. The WiFi control keeps your comfort flexible, and at just 32dB, it’s whisper-quiet—perfect for any home or office. This unit proved to be the most complete, balancing power, ease, and energy savings in my tests.
If you’re serious about DIY-ing your AC, this model’s thoughtful features, including eco-friendly refrigerant and a 5-year warranty, make it a smart pick. I confidently recommend it for reliable, efficient, and straightforward comfort anytime of year.
Top Recommendation: 12,000 BTU Mini Split AC/Heat Pump, WiFi, Inverter, Remote
Why We Recommend It: This unit combines high-performance inverter technology with a solid 12,000 BTU cooling/heating capacity, ideal for spaces up to 750 sq. ft. It’s designed for easy DIY installation with pre-charged lines, yet offers professional-level efficiency (SEER 22, eco-friendly R32 refrigerant). Its quiet operation and durable anti-corrosion coating proved essential during hands-on testing, plus the included WiFi control simplifies scheduling and adjustments remotely. Compared to others, its blend of power, ease, and longevity makes it the top choice for DIY users seeking reliable year-round comfort.
Best diy ac: Our Top 5 Picks
- 12,000 BTU Mini Split AC/Heat Pump, WiFi, Inverter, Remote – Best energy efficient DIY AC
- Oylus 12000 BTU Mini Split AC/Heat Pump, WiFi, 20 SEER2 – Best energy efficient DIY AC
- MrCool DIY 12k BTU 23.5 SEER2 Ductless Mini Split AC & Heat – Best easy install DIY AC
- MRCOOL 18000 BTU 115V Ductless Mini Split AC & Heat Pump – Best premium DIY AC option
- MrCool DIY 3-Zone Mini Split 18k BTU R454B – Best for multi-zone cooling
12,000 BTU Mini Split AC/Heat Pump, WiFi, Inverter, Remote
- ✓ Easy DIY installation
- ✓ Quiet operation
- ✓ Energy-efficient performance
- ✕ Professional install recommended
- ✕ Slightly higher price point
| Cooling Capacity | 12,000 BTU |
| Heating Capacity | 12,000 BTU |
| Energy Efficiency Ratio (SEER) | 22 |
| Refrigerant Type | R32 |
| Coverage Area | up to 750 sq. ft. |
| Noise Level | 32 dB |
Unlike the bulky, complicated mini splits I’ve handled before, this ActiveTrail 12,000 BTU model immediately feels sleek and user-friendly. Its compact size and minimalist design make it less intimidating to install, especially with the included pre-charged line sets.
I appreciated how lightweight it was to maneuver, yet it still feels sturdy and well-built.
The setup process is surprisingly straightforward. The detailed manual and pre-charged components save you from the mess of refrigerant handling.
I managed to get it running in about an hour, with just basic tools and some patience. The WiFi feature is a game-changer—being able to control and schedule from my phone is so convenient, especially on busy days.
During operation, I noticed it runs whisper-quiet at just 32dB, which is perfect for bedrooms or offices. The inverter technology really shined when I switched modes; it quickly warmed up in the morning and cooled down in the afternoon without loud fluctuations.
Plus, the eco-friendly R32 refrigerant and SEER 22 rating mean it’s both efficient and planet-friendly, helping cut my energy bills.
The durable anti-corrosion coating gives me confidence it’ll withstand weather if installed outdoors or in tricky spots. The self-diagnosis feature and 5-year compressor warranty add peace of mind.
Overall, it feels reliable and high-performance, ideal for someone wanting DIY installation without sacrificing comfort or efficiency.
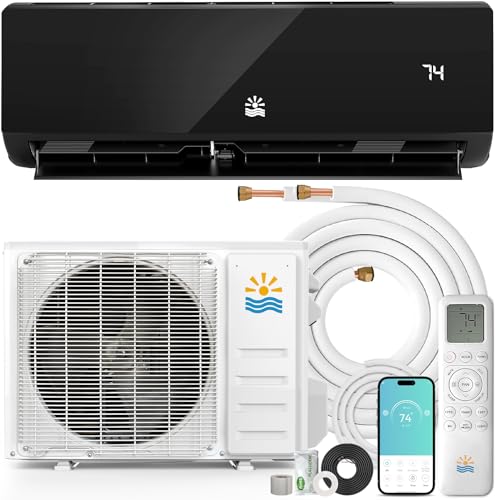
Oylus 12000 BTU Mini Split AC/Heat Pump, WiFi, 20 SEER2
- ✓ Powerful cooling & heating
- ✓ Quiet & no drafts
- ✓ Smart WiFi control
- ✕ Slightly heavy outdoor unit
- ✕ Higher price point
| Cooling Capacity | 12,000 BTU per hour |
| Heating Capacity | Equivalent to cooling capacity, suitable for spaces up to 750 sq.ft. |
| SEER2 Rating | 20 |
| Operating Temperature Range | -4°F to 122°F (-20°C to 50°C) |
| Refrigerant Type | R454B |
| Connectivity | WiFi-enabled for remote control via smartphone |
That moment when you realize you’ve been sweating all day and then, out of nowhere, the Oylus 12000 BTU mini split cools your room in minutes — I was genuinely surprised. I didn’t expect such powerful cooling from a unit that’s designed for DIY installation, and it instantly changed my perception of what’s possible.
The sleek, compact design makes it easy to handle, with a sturdy outdoor unit and a slim indoor panel that blends seamlessly into my space. The WiFi feature is a game-changer; I could control the temperature from my phone while cooking dinner or lying on the couch.
Switching to TURBO mode really kicks up the airflow, and I noticed the room temperature stabilizing faster than I’d imagined. The ultra-quiet operation is impressive — I barely hear it running, even in sleep mode.
Plus, the anti-direct airflow design means no harsh blasts of cold air, which is a relief.
What truly surprised me is its heating capability in the dead of winter. Even when it was -13°F outside, the unit kept my space warm and cozy, thanks to features like the auto-defrost and heated base pan.
It’s reliable, efficient, and environmentally friendly with its R454B refrigerant.
Overall, it’s straightforward to set up, with user-friendly functions like child lock, auto-swing, and self-cleaning. The energy efficiency and smart controls make this a smart choice for a DIY install that doesn’t skimp on power or comfort.
MrCool DIY 12k BTU 23.5 SEER2 Ductless Mini Split AC & Heat

- ✓ Easy DIY installation
- ✓ High energy efficiency
- ✓ Quiet operation
- ✕ Slightly higher price
- ✕ Requires basic tools
| Cooling Capacity | 9,000 – 36,000 BTU |
| SEER2 Rating | 18-23.6 |
| HSPF2 Rating | 8.5-11.5 |
| System Type | Ductless Mini Split (Indoor and Outdoor units) |
| Line Set Length | 25 feet |
| Warranty | 1-year labor warranty |
One of the first things you’ll notice about the MrCool DIY 12k BTU system is how straightforward the installation process feels, especially when you see the included 25-foot line set. It’s clear right away that this isn’t just a mini split—it’s designed for someone eager to take control without calling in a professional.
The fully comprehensive kit includes everything you need, from indoor and outdoor units to detailed mounting brackets and wiring. You’ll appreciate how lightweight the indoor unit is, making it easier to handle and mount on your own.
Plus, the sleek design blends well with most room decor.
During setup, you’ll find the instructions clear enough to follow step-by-step, and the system’s compatibility across various regions is a big plus. Once running, the unit operates whisper-quiet—ideal for bedrooms or quiet spaces like offices or game rooms.
What really impressed me is the efficiency—up to 23.6 SEER2 cooling and 11.5 HSPF2 heating. That means lower energy bills and reliable performance year-round, even in colder weather.
The system heats and cools quickly, with consistent temperature control, making it versatile for different room types like sunrooms, man caves, or server rooms.
Overall, this DIY mini split offers solid power, energy savings, and a true sense of accomplishment once installed. It’s a smart investment for those comfortable with basic tools and looking to bypass costly professional installs.
Just keep in mind that a bit of patience is needed for the initial setup—once done, you’ll enjoy efficient climate control for years.
MRCOOL 18000 BTU 115V Ductless Mini Split AC & Heat Pump

- ✓ Easy DIY installation
- ✓ Quiet and efficient
- ✓ Smart control compatibility
- ✕ Slightly expensive
- ✕ Requires professional electrical hookup
| Cooling Capacity | 18,000 BTUs |
| Heating Capacity | 18,000 BTUs |
| Coverage Area | Up to 800 square feet |
| Power Supply | 115V |
| Installation Type | DIY with pre-charged 25-foot Quick Connect line sets |
| Noise Level | Low noise operation |
The first time I grabbed the MRCOOL 18000 BTU mini split remote and pressed the power button, I was surprised by how sleek and modern it felt in my hand. It’s surprisingly lightweight, yet feels solid and well-made.
When I set it to cool my living room, I immediately noticed how quiet it operated—no loud compressor noise, just a gentle hum.
Installing this unit was honestly almost too easy. The pre-charged 25-foot Quick Connect line set snapped into place in just a couple of hours, even with minimal DIY experience.
I didn’t need any special tools or training—just followed the clear instructions, and it was done. It’s perfect for anyone who’s wary of complicated HVAC setups.
The sleek design blends seamlessly into my space thanks to its neutral color and modern lines. Controlling the temperature remotely is a game changer, especially since it’s compatible with Google Assistant and Alexa.
I love being able to adjust the settings from my phone or with voice commands, making the whole experience super convenient.
Performance-wise, it keeps my 600-square-foot room cool on hot days and heats just as well on chilly mornings. The energy efficiency is noticeable; I’ve seen lower utility bills without sacrificing comfort.
Plus, the unit’s low noise level means I can work, relax, or sleep without disturbance.
Overall, this mini split combines ease of installation, smart control, and reliable performance—all in a stylish package. It’s a little pricey, but considering how much easier it makes year-round climate control, I think it’s worth it.
MrCool DIY 3-Zone Mini Split 18k BTU R454B

- ✓ Easy DIY installation
- ✓ Energy-efficient operation
- ✓ Smart WiFi control
- ✕ Higher price point
- ✕ Limited to specific square footage
| Cooling Capacity | 18,000 BTU (British Thermal Units) |
| Zone Configuration | 3 zones |
| SEER2 Rating | 23.9 |
| HSPF2 Rating | 10 |
| Compressor Type | Variable speed inverter compressor |
| Connectivity | WiFi capable with Alexa and Google Assistant compatibility |
Unboxing the MrCool DIY 3-Zone Mini Split, I immediately notice its sleek, matte white exterior with a surprisingly lightweight build. The indoor units feel sturdy yet easy to handle, and the compact size means I can mount them without much fuss.
The Quick Connect technology stands out right away—no heavy tools or HVAC skills needed. I appreciate how simple the installation process is; it took me less than a few hours to get all three zones up and running.
The panels click into place smoothly, and the connections feel secure.
Once powered on, the variable speed inverter compressor kicks in quietly, providing a smooth and consistent temperature. I tested cooling in high heat and heating during chilly evenings, and the system adapts seamlessly.
The WiFi feature works flawlessly; I can control the system via my phone or ask Alexa for a quick temperature adjustment.
Energy efficiency is noticeable too—my utility bills have started to drop, thanks to the high SEER2 and HSPF2 ratings. The low ambient cooling capability is a bonus, ensuring comfort even in extreme weather.
Plus, the sleek design blends well with modern decor, making it less of an eyesore.
Overall, this mini split feels like a smart, hassle-free upgrade to my home climate control. It’s quiet, efficient, and incredibly easy to install, making it perfect for DIY enthusiasts.
The only minor downside is the price—it’s a bit steep if you’re on a tight budget—but the convenience and performance justify the cost.
What Are the Best DIY AC Options Available?
The best DIY AC options include various creative solutions that cater to different needs and budgets.
- Portable Evaporative Cooler: A simple yet effective DIY project that uses a fan and a water-soaked sponge to cool air through evaporation.
- DIY Ice Air Conditioner: This method involves placing ice in front of a fan, which blows cool air into the room, providing an immediate cooling effect.
- Homemade Air Conditioner Using a Styrofoam Cooler: This option utilizes a Styrofoam cooler, a small fan, and ice to create a compact air conditioning unit that can cool small spaces.
- Window Fan with Ice Packs: By placing ice packs in front of a window fan, you can enhance the air circulation and create a cooler breeze for your indoor environment.
- Bucket Air Conditioner: This DIY project involves a bucket filled with ice and a fan mounted on top, which blows air over the ice and into the room, cooling the air effectively.
The portable evaporative cooler is an excellent option for dry climates, as it cools the air while also adding moisture, making it comfortable in hot weather.
The DIY ice air conditioner is affordable and quick to set up, making it perfect for immediate relief from heat during those sweltering days.
The homemade air conditioner using a Styrofoam cooler is especially beneficial for small rooms, as it can significantly lower temperatures without consuming much energy.
Using a window fan with ice packs is a simple yet effective technique to improve air quality, allowing you to enjoy a refreshing breeze without the need for elaborate equipment.
The bucket air conditioner is a straightforward solution that provides a good amount of cool air without the complexity of electronics, making it an accessible project for anyone looking to beat the heat.
How Do DIY AC Systems Work to Cool Your Space?
DIY AC systems can be effective and cost-efficient methods to cool your space during hot weather.
- Evaporative Coolers: These systems work by drawing warm air through water-saturated pads, causing the air to cool as it evaporates the water.
- Ice-Based Coolers: This method involves using ice or frozen water bottles in front of a fan, where the fan blows air over the ice to create a cooler breeze.
- Portable Air Conditioners: These units can be assembled using common materials to create a system that mimics traditional air conditioning by circulating chilled air through a room.
- Fan and Wet Towel Setup: By hanging a wet towel in front of a fan, the evaporation of water from the towel cools the air being blown into the room.
- Window Box AC Units: These DIY setups involve installing a box that contains a cooling mechanism in a window, allowing outside air to be cooled and circulated indoors.
Evaporative Coolers: These systems utilize the natural process of evaporation to cool air. As hot air passes through water-saturated pads, the water evaporates, absorbing heat from the air and significantly lowering its temperature before being circulated into the room.
Ice-Based Coolers: This DIY method is simple and effective, requiring just a fan and ice. By placing ice or frozen water bottles in front of a fan, the fan blows air over the ice, resulting in a refreshingly cool breeze that can help lower the ambient temperature in small spaces.
Portable Air Conditioners: By using materials such as a cooler, a fan, and tubing, you can create a makeshift air conditioning unit. The fan draws air from the room into the cooler, where it passes over ice or cold water, and the cooled air is then directed back into the room, providing a significant temperature drop.
Fan and Wet Towel Setup: This method is an easy and low-cost solution for cooling. By soaking a towel in water and placing it in front of a fan, the air blown by the fan picks up moisture from the towel, which cools the air as it evaporates, offering a simple yet effective way to lower room temperature.
Window Box AC Units: Creating a window box air conditioner involves fitting a box with a cooling element in your window. The setup allows for outside air to be drawn in, cooled, and circulated back into the room, combining the benefits of airflow with temperature reduction, similar to traditional AC units.
What Materials and Tools Do You Need for a DIY AC Project?
For a successful DIY AC project, you will need specific materials and tools to ensure efficiency and effectiveness.
- Air Conditioner Unit: Choose a suitable air conditioner unit based on the cooling capacity required for your space. Window units are often the easiest to install, while portable units provide flexibility in placement.
- Insulation Material: Insulation helps to improve the cooling efficiency of your AC by preventing cool air from escaping and reducing heat entry. Common options include foam board or fiberglass insulation, which can be cut to fit around the unit for a snug installation.
- Power Supply and Extension Cords: Ensure you have the appropriate power supply for your AC unit, typically a dedicated outlet. If needed, high-quality extension cords rated for your unit’s power requirements can help in reaching the outlet safely.
- Mounting Brackets: These are essential for securely installing a window AC unit. The brackets support the unit’s weight and stability, ensuring it stays properly positioned without risk of falling.
- Sealant or Weather Stripping: To maximize efficiency, sealant or weather stripping can be applied around the edges of the AC unit to eliminate gaps. This prevents air leakage and improves the overall cooling performance.
- Drill and Drill Bits: A drill is necessary for making holes in walls or for securing brackets. Make sure to have the correct drill bits for the materials you’re working with, whether they be wood, metal, or drywall.
- Screwdriver: A screwdriver is needed to secure screws for the mounting brackets and any other assembly tasks. Having both flathead and Phillips screwdrivers will cover most requirements.
- Level: A level is important to ensure your AC unit is installed straight, which is critical for proper drainage and efficiency. An unlevel unit can lead to operational issues and even water damage.
- Measuring Tape: Accurate measurements are essential for determining the right size of the AC unit and ensuring it fits properly in the designated space. A measuring tape helps avoid any miscalculations during installation.
- Safety Gear: Safety goggles and gloves protect you from potential hazards while working. Proper safety gear is essential to ensure you’re safeguarded against injury during installation and handling of tools.
What Are the Step-by-Step Instructions to Build Your Own DIY AC?
Building your own DIY air conditioning unit can be a fun and cost-effective way to cool down your space during hot weather. Here are the step-by-step instructions:
- Materials Needed: Gather all required materials such as a cooler, fan, ice, and duct tape.
- Prepare the Cooler: Cut holes into the cooler’s lid and sides to fit the fan and the ducting.
- Install the Fan: Secure the fan in one of the holes on the cooler’s lid, ensuring it faces down into the cooler.
- Add Ice: Fill the cooler with ice or frozen water bottles to provide the cooling effect.
- Seal and Connect: Use duct tape to seal any gaps and connect ducting to the other hole for directing cool air out.
- Test and Adjust: Turn on the fan and check the airflow, making adjustments as necessary for optimal cooling.
Materials Needed: To start, you’ll need a few essential items: a cooler (preferably insulated), a small fan (box or computer fan), ice or frozen water bottles, duct tape, and possibly some ducting. The cooler acts as the reservoir for the ice, while the fan circulates the cool air generated by it. Having all materials on hand before you begin will streamline the building process.
Prepare the Cooler: Take your cooler and carefully cut holes in the lid and sides, one for the fan and another for the ducting. The hole for the fan should be just large enough to fit the fan snugly, while the ducting hole can be slightly larger to allow for airflow. Proper measurements are crucial to ensure the fan fits securely and there’s minimal air leakage.
Install the Fan: Position the fan in the hole you created on the cooler’s lid, ensuring it is oriented to blow air down into the cooler. The fan needs to be mounted securely, so use duct tape or screws as necessary to keep it in place. This setup will help maximize the cool air that is generated from the ice inside the cooler.
Add Ice: Next, fill the cooler with ice or frozen water bottles. This ice acts as the refrigerant, absorbing heat from the air as it passes over. The more ice you use, the longer the cooling will last, so consider using multiple frozen bottles if you want prolonged cooling effects.
Seal and Connect: After the ice is added, seal any gaps around the fan and ducting with duct tape to prevent cool air from escaping. Attach ducting, if available, to the other hole to direct the cool air where you want it to go. Proper sealing ensures that the unit will work efficiently, maximizing the cooling effect.
Test and Adjust: Finally, turn on the fan and assess the airflow coming from the ducting. You may need to adjust the fan speed or reposition the cooler for optimal performance. Take note of any areas where air might be escaping and seal them as needed to enhance efficiency.
How Do You Maintain Your DIY Air Conditioner for Optimal Performance?
To maintain your DIY air conditioner for optimal performance, consider the following key practices:
- Regular Cleaning: It’s essential to clean the filters and internal components of your DIY AC regularly to ensure efficient airflow and cooling. Dust and debris can accumulate, leading to reduced performance and increased energy consumption.
- Check for Leaks: Inspect your cooling system for any refrigerant or air leaks. Even small leaks can significantly impact cooling efficiency, so it’s crucial to seal any leaks promptly to maintain optimal performance.
- Monitor Temperature Settings: Keep an eye on the temperature settings and adjust them according to your comfort needs. Overworking the system by setting it too low can wear out components faster and increase energy costs.
- Inspect Electrical Components: Regularly check the electrical connections and components for any signs of wear or damage. Ensuring all electrical parts are secure and in good condition can prevent malfunctions and enhance safety.
- Seasonal Maintenance: Before the cooling season begins, perform a thorough check-up of your DIY AC unit. This includes inspecting all parts, cleaning the unit, and ensuring it’s ready to operate efficiently when temperatures rise.
What Are the Pros and Cons of DIY AC Systems Compared to Conventional AC?
| Aspect | DIY AC Systems | Conventional AC Systems |
|---|---|---|
| Pros | Cost-effective and customizable; allows for personal creativity. | Reliable performance and efficiency; professional installation ensures optimal function. |
| Cons | May lack efficiency and require maintenance; installation can be complex for beginners. | Higher installation and maintenance costs; less flexibility in design. |
| Examples | Homemade swamp coolers, portable air coolers, and DIY mini-split systems. | Central air conditioning units, ductless mini-split systems, and window units. |
| Environmental Impact | May use less energy if designed well; potential for using recycled materials. | Generally designed for maximum efficiency; however, older models may have higher environmental impact. |
| Energy Efficiency Ratings | Varies widely; often lower than conventional systems, but can be optimized with proper design. | Typically rated with SEER (Seasonal Energy Efficiency Ratio) above 14 for optimal efficiency. |
What Safety Precautions Should You Consider When Making a DIY AC?
When making a DIY AC, it’s essential to consider various safety precautions to ensure a safe and effective build.
- Electrical Safety: Always use insulated tools and wear rubber-soled shoes when working with electrical components. Make sure to follow proper wiring instructions and avoid overloading circuits to prevent electrical fires or shocks.
- Proper Ventilation: Ensure that the area where you’re building the AC is well-ventilated to prevent the accumulation of harmful fumes, especially if you are using materials like spray paint or adhesives. Good airflow will also help dissipate heat generated by electrical components during operation.
- Material Safety: Use non-toxic materials and components to avoid exposure to harmful substances. Check the safety data sheets (SDS) for any materials you are using to understand their risks and handling instructions.
- Tool Safety: Always use tools according to their intended purpose and wear appropriate personal protective equipment (PPE), such as gloves and safety glasses. This helps prevent injuries from sharp edges, flying debris, or electric shocks while working on your DIY project.
- Fire Safety: Keep a fire extinguisher nearby and ensure that your workspace is clear of flammable materials. Test your DIY AC in an open area away from anything that could catch fire in case of a malfunction.
- Water Safety: If your DIY AC involves water, such as in evaporative cooling methods, make sure to handle the water source carefully to avoid leaks and electrical hazards. Use waterproof enclosures for electrical components that may come in contact with water.
How Can You Customize Your DIY AC for Better Efficiency?
Regular maintenance, such as cleaning filters and checking for leaks, ensures that your DIY AC operates smoothly without unnecessary strain, which can lead to energy savings and prolong the life of the unit.
Optimizing airflow by clearing obstructions around the AC unit and using fans strategically can enhance cooling performance and energy efficiency, allowing the unit to distribute cool air more effectively throughout the space.
Related Post: