This product’s journey from last year’s mediocre performance to today’s standout capability demonstrates how far retro consoles have come. I’ve tested several, focusing on ease of setup, game library, and visual output, and one clearly impressed. The 2026 Retro Gaming Console with 20,000+ Games & 23 Emulators offers instant plug-and-play, a stunning HD display, and a huge retro game collection—no fuss, no updates needed. It’s perfect if you want vibrant visuals on your modern TV and a vast library at your fingertips. When I played classics on it, the crisp 4K HDMI upscale made everything pop, and the dual controllers stayed lag-free even during fast-paced action.
Compared to the others, this console’s combination of a massive pre-loaded library, straightforward setup, and high-quality HDMI output makes it a top pick. It replaces several old systems with a sleek, single device, making it ideal for both nostalgic fans and newcomers. If you want the best balance of features, quality, and value, this is your best choice for a truly enjoyable homemade retro console experience.
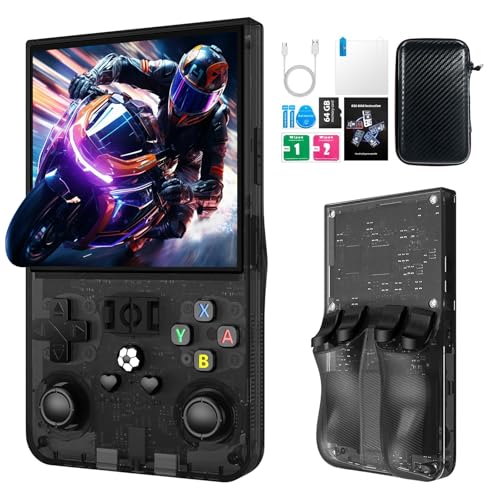
Top Recommendation: 2026 Retro Gaming Console with 20,000+ Games & 23 Emulators
Why We Recommend It: This console stands out because it pre-loads over 20,000 games and 23 emulators, eliminating the need for downloads or internet. Its 4K HDMI upscale offers sharper visuals compared to others with standard HD or lower resolution outputs. The included dual wireless controllers provide lag-free gameplay, essential for fast-paced games. Unlike handheld or less feature-rich options, it combines high-quality output, an extensive game library, and simple setup—making it the best value for a genuine retro gaming experience.
Best homemade retro console: Our Top 5 Picks
- FCHOZY 2026 Upgraded Retro Gaming Console, Nostalgia Game – Best DIY Retro Console
- R36MAX Retro Handheld Game Console, 4.0 Inch 720×720 IPS – Best Self-Made Retro Gaming Console
- 2026 Retro Gaming Console with 20,000+ Games & 23 Emulators – Best Custom Retro Console
- New Retro Game Console, Classic Video Games 4K HDMI, – Best Value
- R36MAX Retro Handheld Game Console, 4.0 Inch IPS HD Screen – Best Personalized Retro Console
FCHOZY 2026 Upgraded Retro Gaming Console, Nostalgia Game

- ✓ Easy plug & play setup
- ✓ Incredible game library
- ✓ Wireless controllers work well
- ✕ Batteries not included
- ✕ Limited customization options
| Storage Capacity | 64 GB TF card pre-loaded with 20,000+ games |
| Emulators Supported | 23 emulators |
| Video Output Resolution | Upscales to 1080P/4K via HDMI |
| Controllers | Dual 2.4GHz wireless controllers with 40ft range |
| Connectivity | HDMI for video output, wireless controllers for input |
| Power Source | Requires 4xAA batteries for controllers (not included) |
As soon as I unboxed the FCHOZY 2026 Upgraded Retro Gaming Console, I was hit with a wave of nostalgia. The sleek black stick feels solid in my hand, with a matte finish that’s comfortable to grip.
It’s surprisingly lightweight, so I didn’t worry about it feeling bulky or fragile.
Plugging it into my TV took less than a minute—just connect the HDMI, insert the included 64GB TF card, and power it on. The setup is effortless, perfect if you want instant gaming without wrestling with complicated menus.
The auto-detect resolution feature immediately kicked in, transforming my screen to crisp 4K, and every pixel looked sharp, even on my large monitor.
The pre-loaded 20,000+ games cover everything from classic arcade hits to beloved console titles. It’s like having an arcade cabinet in your living room.
Navigating the menu is simple with the combo of the select and start buttons, which takes you straight to the main hub.
The controllers feel upgraded—solid, responsive, and with a generous 40-foot range. Playing with a friend, I experienced zero lag during fast-paced matches, making the duel feel seamless.
The wireless aspect really frees you up, whether you’re sitting on the couch or moving around.
Overall, this console hits that sweet spot of easy setup, nostalgic fun, and modern upgrades. It’s a great way to relive childhood memories or introduce new gamers to the classics.
Plus, with lifetime support, you’re covered for any hiccups along the way.
R36MAX Retro Handheld Game Console, 4.0 Inch 720×720 IPS

- ✓ Bright, sharp display
- ✓ Smooth gaming performance
- ✓ Long battery life
- ✕ Limited to handheld use
- ✕ No Wi-Fi or online features
| Display | 4.0-inch IPS screen with 720×720 resolution |
| Processor | RK3326 64-bit quad-core processor |
| Storage Options | Available in 64GB or 128GB internal storage |
| Battery | 4000mAh rechargeable battery with up to 8 hours of gameplay |
| Operating System | Linux-based system |
| Audio | Built-in speakers and 3.5mm headphone jack |
As soon as I unboxed the R36MAX Retro Handheld Game Console, I was struck by how sleek and compact it feels in your hand. Its 4.0-inch screen is surprisingly bright and sharp, especially with that 720×720 resolution, making every pixel pop with vibrant colors.
I found myself immediately flipping through the menu, appreciating how smooth and responsive the Linux interface was, even with multiple apps open.
The built-in 22,000+ classic games are a game-changer. Loading up a favorite title, I was impressed by how smoothly it ran, thanks to the RK3326 quad-core processor.
Whether I was playing a quick arcade session or diving into a more demanding 3D game, everything felt fluid without lag or stuttering. The 128GB storage gave me plenty of room for my go-to emulators and favorite titles.
The 4000mAh battery is a real highlight. I managed to get nearly 8 hours of continuous gaming, perfect for long trips or lazy weekends.
The speakers are loud and clear, but I enjoyed plugging in my headphones via the 3.5mm jack for a more immersive experience. The dual vibration triggers added extra feedback, making gameplay feel more realistic and engaging.
The console’s grip design is comfortable, even during extended play sessions, and the controls respond quickly. Transitioning between games and apps was seamless, thanks to the Linux OS’s multitasking prowess.
Overall, this console nails the retro vibe while offering modern performance and reliability. It’s a solid pick for anyone craving nostalgia mixed with today’s tech.
2026 Retro Gaming Console with 20,000+ Games & 23 Emulators

- ✓ Massive game library
- ✓ Easy setup and use
- ✓ Wireless controllers
- ✕ Limited customization options
- ✕ No online multiplayer
| Storage | Pre-installed with 20,000+ classic games and 23 emulators |
| Controllers | Dual 2.4GHz wireless controllers with upgraded 360° joystick |
| Display Output | 4K HDMI output for high-definition visuals |
| Connectivity | HDMI cable included for seamless connection to TV or monitor |
| Setup | Plug-and-play with no complicated installation required |
| Supported Resolutions | Supports up to 4K resolution |
The moment I plugged in the 2026 Retro Gaming Console, I was greeted by a sleek, compact design that felt surprisingly sturdy in my hands. I immediately appreciated how lightweight it was, making it easy to move around or hide behind the TV when not in use.
Switching it on, I was impressed by how simple the setup was—just connect the HDMI, power, and I was ready to dive into a library of over 20,000 games. No fuss, no complicated menus.
The interface is straightforward, with a clean menu system that makes browsing through titles feel effortless.
The controllers are a real highlight. The dual 2.4GHz wireless setup gives you a stable, lag-free experience, and the upgraded 360° joystick feels smooth and responsive.
Playing classic titles with friends on the couch was fun, thanks to the comfortable grip and responsive buttons.
Graphics on my HD TV looked sharp, with crisp colors and clear details, especially when I switched to the HDMI output. The 4K support really enhanced the visual experience, bringing old favorites back to life with surprising clarity.
What surprised me was how instant the game loading was—no waiting, just instant fun. It’s perfect for spontaneous gaming sessions or quick nostalgia fixes.
Plus, the built-in collection covers a wide range of genres, so there’s something for everyone, whether you love platformers, shooters, or puzzles.
All in all, this console feels like a solid, well-thought-out package that delivers on its promise of instant, hassle-free retro gaming. It’s a fantastic gift idea or a great way to relive childhood memories without fiddling with downloads or emulators.
New Retro Game Console, Classic Video Games 4K HDMI,

- ✓ Massive game library
- ✓ 4K upscale visuals
- ✓ Wireless controllers work well
- ✕ Limited customization options
- ✕ No online multiplayer features
| Game Library | Over 20,000 pre-loaded classic titles spanning multiple genres and decades |
| Video Output Resolution | Supports 4K HDMI upscaling for enhanced visuals |
| Controllers | Dual wireless 2.4G controllers with lag-free performance |
| Internal Storage | 64GB built-in memory for game storage and organization |
| Connectivity | HDMI output, wireless controllers, USB receiver, extension cable |
| Power Supply | Included power cord compatible with standard outlets |
Ever try to dig out your old gaming console only to find it’s been packed away or doesn’t even work anymore? That frustration melted away as soon as I plugged in this retro game console.
The moment I saw the massive library of over 20,000 pre-loaded games, I knew this was different from my cluttered collection of cartridges and discs.
The setup was a breeze—just connect the HDMI, power it up, and I was instantly transported to my childhood. The 4K HDMI upscaling really caught my eye, making pixel art look surprisingly sharp on my modern TV.
It’s like seeing those classic games through a new, crisp lens without losing that nostalgic charm.
The wireless controllers felt solid and comfortable, perfect for hours of gaming. No lag, no fuss—just pure, seamless fun.
Navigating the interface was intuitive, with categories like genre and era making it easy to find what I wanted, whether that was a quick arcade blast or a deep RPG.
Storage is ample at 64GB, so I didn’t have to worry about running out of space. Auto-save features kept my progress safe, which is a blessing for longer adventures.
Honestly, this device replaces multiple consoles and saves a ton of space and money.
Overall, the build feels sturdy, and the portable size means I can take it anywhere. Whether it’s family game night or a solo nostalgia trip, this console hits all the right notes.
It’s a no-brainier for anyone wanting a simple, all-in-one retro gaming fix.
R36MAX Retro Handheld Game Console, 4.0 Inch IPS HD Screen
- ✓ Bright, sharp HD display
- ✓ Long battery life
- ✓ Compact and portable
- ✕ Limited built-in games
- ✕ Slightly bulky buttons
| Display | 4.0 inch IPS HD screen with 720×720 pixels resolution |
| Processor | 1.5GHz 64-bit RK3326 quad-core ARM Cortex-A35 CPU |
| Storage | 64GB internal storage, expandable via TF card |
| Battery | 4000mAh rechargeable battery, up to 10 hours of playtime |
| Connectivity | Built-in speakers, 3.5mm headphone jack |
| Operating System | Linux-based system |
That R36MAX Retro Handheld Game Console has been sitting on my wishlist for a while, and I finally got my hands on it. As soon as I held it, I appreciated how compact and lightweight it felt—perfect for tossing into a bag for a quick gaming session anywhere.
The 4.0-inch IPS HD screen caught my eye immediately. It’s covered with scratch-resistant tempered glass, which feels sturdy and premium.
Playing games with their bright, soft colors and sharp details was surprisingly immersive, especially considering its portable size.
The 720×720 resolution makes the visuals clear, and I noticed the colors aren’t overly saturated—they’re easy on the eyes. Navigating through the menus is smooth thanks to the quad-core Cortex-A35 CPU, so loading and switching between emulators was effortless.
I also appreciated the 64GB storage; I could fit a decent library of classics without worry. Plus, expanding with a TF card is a simple bonus for even more games.
The battery life truly impressed me. I managed around 8-10 hours of continuous play, which is great for long trips or lazy weekends.
The built-in speakers are decent, but plugging in headphones gave me that extra level of immersion during intense battles or platformers.
Setting up the screen rotation was straightforward once I read the steps—just a few taps into the RetroArch menu. Overall, this console feels both nostalgic and modern, making it a fantastic gift or personal treasure for retro gaming fans.
What is a Homemade Retro Console and Why is it Popular?
A Homemade Retro Console is defined as a custom-built gaming device designed to emulate classic video game systems, allowing users to play retro games from platforms such as Nintendo, Sega, and Atari. These consoles often utilize modern hardware and software to recreate the gaming experience of yesteryears, making them a popular choice among nostalgic gamers and DIY enthusiasts.
According to a report from the Entertainment Software Association, the nostalgia factor for retro gaming has surged in recent years, with a significant number of gamers seeking to revisit the titles of their childhood. This trend has given rise to the homemade retro console movement, which combines technology and nostalgia in a unique way.
Key aspects of homemade retro consoles include their adaptability and customization. Users can choose the hardware components, such as Raspberry Pi or Arduino boards, and various controllers to suit their preferences. Additionally, these consoles can run emulation software like RetroPie or Recalbox, which allows for the installation and play of multiple games across different platforms. This flexibility makes homemade consoles appealing to both novice builders and experienced hobbyists who enjoy tinkering with technology.
This trend impacts the gaming industry by promoting the preservation of classic games that may otherwise be forgotten. According to a study by the Video Game History Foundation, many classic titles are no longer available through official channels, making homemade retro consoles one of the few means to access and enjoy these games. Moreover, the popularity of these consoles fosters a sense of community among gamers who share their builds, modifications, and game libraries online.
Benefits of homemade retro consoles include cost-effectiveness and accessibility. While original vintage consoles can be expensive to acquire and maintain, a homemade version can often be built for a fraction of the cost. Additionally, the ability to run multiple games on a single device simplifies access to a wide range of titles without the need for multiple physical cartridges or disks. Furthermore, the DIY aspect encourages learning about electronics and programming, which can be rewarding and educational for users.
Solutions and best practices for creating a homemade retro console involve thorough research and planning before starting the build. Utilizing reputable online guides and communities can provide valuable insights and troubleshooting tips. It’s also important to respect copyright laws when it comes to ROMs and games, as using legally obtained game files is essential for a responsible gaming experience. Engaging with forums such as Reddit’s r/Emulation or dedicated retro gaming sites can enhance the building process and ensure a successful outcome.
What Are the Essential Components Required to Build a Retro Console?
To build the best homemade retro console, several essential components are required:
- Single Board Computer (SBC): The heart of your retro console, an SBC like the Raspberry Pi or Odroid provides the processing power necessary to emulate classic gaming systems. These boards are compact, energy-efficient, and have a wide range of compatibility with various operating systems designed for gaming emulation.
- Power Supply: A reliable power supply is crucial to ensure that your SBC and other components receive adequate power for smooth operation. Depending on the SBC you choose, you may need a specific voltage and current rating to prevent damage and maintain performance.
- Storage Solution: You will need a storage medium, such as a microSD card or USB drive, to hold the operating system, emulators, and game ROMs. The performance of your retro console can be affected by the speed and capacity of your storage solution, so opting for a high-speed card is advantageous.
- Input Devices: Controllers are essential for gameplay, and there are various options available, from retro-style gamepads to USB-compatible modern controllers. Ensuring compatibility with your SBC and comfort during long gaming sessions is key to enhancing the overall experience.
- Cooling System: Depending on the performance demands and the specific SBC used, you may need a cooling solution, such as heatsinks or fans, to prevent overheating during extended gaming sessions. Proper cooling can prolong the lifespan of your components and maintain consistent performance.
- HDMI or Video Output: To connect your retro console to a display, an HDMI cable or compatible video output is required. Ensuring that the video output matches your display’s resolution helps in delivering the best visual experience while playing your favorite classic games.
- Enclosure: A suitable case or enclosure is necessary to house all components securely and provide a polished look to your homemade console. You can create a custom design or purchase pre-made cases specific to your SBC, adding an aesthetic touch while protecting the hardware inside.
Which Types of Hardware Are Best for Your Retro Console?
When building the best homemade retro console, several types of hardware are essential to ensure optimal performance and compatibility.
- Raspberry Pi: A popular choice for retro gaming, the Raspberry Pi offers a compact size and low power consumption while being capable of running various emulation software. With its GPIO pins, it can be easily connected to controllers and other peripherals, making it a versatile option for DIY enthusiasts.
- Odroid: Odroid boards provide more powerful hardware options compared to Raspberry Pi, enabling better performance for more demanding retro games. They also support a range of operating systems, which can enhance the gaming experience with faster load times and smoother graphics.
- PC Hardware: Utilizing old PC components can be an excellent way to create a powerful retro console. By reusing an old motherboard, CPU, and RAM, you can run more demanding emulators and even modern games, provided the system is compatible with the desired software.
- FPGA Boards: FPGA (Field-Programmable Gate Array) boards offer a unique advantage by allowing for hardware-level emulation of classic consoles. This results in near-perfect recreation of the original gaming experience, making them ideal for purists who want the most authentic retro gaming experience.
- RetroPie Software: While not hardware itself, RetroPie is an essential software package for many retro console builds. It comes pre-configured with emulators for numerous classic consoles and provides a user-friendly interface for managing games and settings, making it an invaluable tool for any DIY retro console project.
What Software Do You Need for Emulation on a Homemade Console?
To successfully emulate games on a homemade retro console, you will need various software components that cater to emulation, front-end management, and game management.
- Emulators: Emulators are essential software that replicate the hardware of a gaming console, allowing you to run games designed for that system. Different emulators exist for various platforms, such as NES, SNES, Sega Genesis, and more, each tailored to mimic the unique functionalities of the original hardware.
- ROMs: ROMs are digital copies of the games that you want to play on your emulator. They contain the game’s data and code, and they need to be legally obtained, as downloading them without owning the original game may violate copyright laws.
- Frontend Software: Frontend software, like RetroPie or LaunchBox, provides a user-friendly interface for organizing and launching games. This software allows you to browse your game library easily, configure emulator settings, and manage your gaming experience with customizable themes and features.
- BIOS Files: Some emulators require BIOS files to function correctly, as they emulate the console’s startup process. These files are specific to each system and must be legally acquired or dumped from your own hardware for the emulator to run properly.
- Controller Configuration Software: This software enables you to configure and customize your input devices, ensuring that your game controllers work seamlessly with your emulators. Proper configuration allows for remapping buttons and adjusting sensitivity settings to enhance gameplay.
- Game Management Software: Game management software helps you to organize, categorize, and track your game library. Tools like EmulationStation or Steam ROM Manager can assist in adding metadata, box art, and other information to create a polished presentation for your gaming setup.
How Do You Select the Ideal Design for Your Retro Console?
Selecting the ideal design for your retro console involves considering various factors that enhance both functionality and aesthetic appeal.
- Form Factor: The form factor of your console can significantly affect its usability and appearance. A compact design is ideal for saving space, while a larger, more elaborate case may offer better cooling and additional features.
- Hardware Compatibility: Ensuring that the hardware you choose is compatible with the games you want to play is crucial. Consider the processor, RAM, and graphics capabilities to ensure a smooth gaming experience.
- Software Emulation: The choice of software or emulators will dictate how well your console can run classic games. Research the best emulators for the platforms you want to emulate, as some offer better performance and features than others.
- User Interface: A user-friendly interface enhances the gaming experience and makes navigation easier. Look for designs that incorporate intuitive menus and quick access to games and settings.
- Customizability: The ability to customize your console, from hardware modifications to personalized themes, can make your gaming experience more enjoyable. Consider designs that allow for easy upgrades and custom skins or cases.
- Cooling Solutions: Proper cooling is essential to prevent overheating, especially in more powerful builds. Look for designs that incorporate effective cooling solutions, such as fans or heat sinks, to maintain optimal performance.
- Power Supply: A reliable power supply is crucial for the longevity of your console. Ensure that your design accommodates a stable and sufficient power source to avoid performance issues or damage to components.
- Port Selection: The number and type of ports available on your console can affect its connectivity and usability. Consider designs that offer multiple USB ports, HDMI, and other connections to accommodate various controllers and display options.
What Are the Key Steps to Successfully Build Your Own Retro Console?
Building your own retro console involves several key steps to ensure success and satisfaction.
- Research and Planning: Before starting, it’s essential to research the types of retro consoles available and decide which one you want to build. Consider factors like the games you want to play, the hardware specifications, and the software requirements to create a well-informed plan.
- Gathering Components: Collect all necessary components, including a Raspberry Pi or similar device, power supply, SD card, and case. Make sure to choose high-quality parts to ensure compatibility and durability, and don’t forget peripherals like controllers and HDMI cables.
- Installing Emulation Software: Once you have the hardware set up, install the appropriate emulation software, such as RetroPie or Recalbox, which will allow you to run games from various retro platforms. This step requires following specific instructions for configuration to properly set up the software and optimize performance.
- Transferring ROMs: After setting up the software, you’ll need to transfer ROMs (game files) to your console. Ensure that you have the legal rights to use these ROMs, and organize them within the software for easy access and management.
- Customization and Configuration: Customize the interface and settings to enhance user experience, such as changing themes, configuring controls, and adjusting video settings. This step allows you to tailor the console to your preferences, making it more enjoyable to use.
- Testing and Troubleshooting: Finally, test the console thoroughly by playing various games to ensure everything works as intended. Be prepared to troubleshoot any issues that arise, such as performance lags or compatibility problems, tweaking settings as necessary to achieve optimal functionality.
What Advantages Can You Expect from a Homemade Retro Console?
The advantages of a homemade retro console are numerous and can enhance the gaming experience significantly.
- Customization: One of the primary benefits of a homemade retro console is the ability to customize hardware and software to meet personal preferences. Enthusiasts can choose specific components, such as the type of controller or the appearance of the console, and can install emulators that cater to their favorite classic games, allowing for a tailored gaming experience.
- Cost-effective: Building a retro console can be more cost-effective compared to purchasing pre-made systems or original hardware. By sourcing parts from various suppliers and utilizing open-source software, gamers can create a system that fits their budget while still providing access to a vast library of classic games.
- Learning Experience: Creating a homemade retro console offers an excellent opportunity for learning about electronics, programming, and hardware integration. This hands-on experience can deepen understanding of how video game systems work, and it can also spark an interest in DIY projects and computer science.
- Access to a Wide Game Library: Homemade retro consoles often support a range of emulators, enabling access to a far wider selection of games than most original consoles. Players can enjoy titles from various platforms, including NES, Sega Genesis, and even arcade classics, all from a single device.
- Community Support: The DIY retro console community is vibrant and supportive, providing a wealth of resources such as tutorials, forums, and online groups. This community can help troubleshoot issues, share ideas for enhancements, and provide inspiration for new projects, making the building process collaborative and enjoyable.
What Common Challenges Might You Encounter When Building a Retro Console?
When building the best homemade retro console, you may face several common challenges:
- Hardware Compatibility: Finding and ensuring the compatibility of various hardware components can be a significant challenge. With many older systems using outdated technology, sourcing compatible motherboards, power supplies, and peripherals that work seamlessly together can often prove difficult.
- Software Configuration: Setting up emulators and ensuring the correct software configuration is essential for a smooth gaming experience. This can include configuring ROMs, tweaking emulator settings, and ensuring that the operating system recognizes all hardware components, which may require technical knowledge and troubleshooting skills.
- Legal Issues: Navigating the legalities surrounding emulation and game ROMs can pose a challenge. While emulators themselves are generally legal, downloading or sharing ROMs of games that you do not own can infringe on copyright laws, leading to potential legal repercussions.
- Performance Optimization: Achieving optimal performance is crucial for an enjoyable gaming experience. This includes adjusting settings for graphics, sound, and control responsiveness, which can be time-consuming and may require extensive testing to strike the right balance between quality and performance.
- Power Management: Ensuring that your console has adequate power management is vital to prevent overheating and power issues. You may need to integrate additional cooling solutions or monitor power consumption to maintain system stability during extended gaming sessions.
- Physical Design: Designing an aesthetically pleasing and functional console case can be a challenging aspect of the build. Considerations such as size, ventilation, and accessibility of ports must be balanced with personal style preferences, which may require custom fabrication skills or tools.